Moving your Google Drive files from a Google Workspace account to a personal Google account is harder than it should be! I’ve broken down my process and the many hurdles on the way.
This is one part of my recent project to escape Google Workspace. You can read more about this in my Escaping Google Workspace post.
Assumptions
This post makes the assumption that you’ve; still got access to your old Google Workspace account, that your new personal Google account is setup, and that your new personal Google account has sufficient storage to move all your files over. If not, we’ll go through that process in Escaping Google Workspace.
Step 1 - Take (more) backups!
In addition to making a Google Takeout backup, I’d highly recommend making a full clone of your Google Drive files with a tool like rclone. This step is important because:
- Takeout doesn’t include files in your Google Drive account which are owned by other users.
- The backup covers us in-case something goes wrong during the move.
- We’ll use this backup for verification of the account post migration.
Introduction to rclone

rclone is an awesome open-source command line utility which lets you manage your files across various storage providers. For example, you could use it to copy all your files from Dropbox to Google Drive, or regularly sync files from Google Drive to your computer.
We’ll be using it to backup your Google Drive, migrate files between accounts and verify everything is still in place at the end.
Installing rclone
See the rclone downloads page for more information.
On macOS I usually install it through brew, and on Linux I tend to use apt-get update && apt-get install rclone
Using a cloud server
I’d recommend using rclone on a cloud server if you don’t have a particularly fast internet connection, have a data cap, or don’t have sufficient local storage for a backup all your files. A cloud server will have a quick internet connection with low latency to Google servers.
When I need to do things like this I tend to spin up a cheap cloud server with a provider like Hetzner, Digital Ocean or Vultr. These servers are billed hourly so you can destroy the server when you’re finished. You may also need to attach some block storage to gain some additional space.
I connect over SSH and run my commands within a screen or tmux session. This means that I can kill my SSH connection without interrupting rclone’s operations.
Linking account remotes
Link your Google accounts as rclone remotes through rclone config. Give the accounts clear names so you know which one is old and new! rclone has a fairly simple interactive command line interface so you don’t need to remember any commands.
> rclone config
No remotes found - make a new one
n) New remote
s) Set configuration password
q) Quit config
n/s/q>
rclone will step you through the process of (optionally) setting up your own API keys and linking your Google Drive accounts.
Making a backup with rclone
Run a command like this to make a backup:
rclone sync --verbose --progress --drive-skip-shortcuts old-google-drive:/ /local-backup-destination
The options used here are:
--verboseand--progress- so you can see what’s happening--drive-skip-shortcuts- skips transferring Google Drive shortcuts since these tend to cause errors or will map to the wrong place now that you’ve made a copy.
Step 2 - Understanding Google Drive and it’s limitations
Unfortunately getting your files into your new account isn’t quite as easy as hitting a transfer button - particularly when one of the accounts is a Google Workspace account.
Before we begin, lets get a better understanding of how Google Drive works.
Google Drive files/folders have an owner
- The owner of a file/folder the person who created/uploaded it.
- Even if you own a folder, it doesn’t mean you own all the files within the folder. If another user uploads a file to the folder, creates a sub-folder or moves something from their drive to the folder then they’ll remain the owner of those files.
- A file counts against it’s owners file storage allowance. That means if you put a file into a friends shared folder, it’ll still be your file and count against your storage unless you make them the owner.
-
The exception to this rule is Shared Drives.
Shared Drives are a Google Workspace feature (on “Business Standard” and above plans) which mean the organisation owns the files in the Shared Drive rather than an individual user, we’ll talk more about Shared Drives shortly.
Google Drive files can become ‘unorganized’
While messing around with Google Drive and making a few mistakes, I discovered that files would sometimes go to an orphaned ‘unorganized’ state. These are files which you own or have access to but they aren’t organised in any of your folders.
You can find these by searching Google Drive for is:unorganized owner:me - for more information see CBackup’s article; “How to Search Files in Google Drive with ‘Is Unorganized Owner Me’?”.
You can’t actually delete other peoples files/folders
This one sounds a bit weird, but you can’t actually delete files/folders owned by other users within a shared folder - even if you own the folder.
When you do, it removes the file from the folder but moves the file to the owners root “My Drive” folder. For some more context on this, see the Google article “Delete and restore files in Google Drive”
Step 3 - Transferring file ownership
Let’s start moving files between accounts! But first, we need to cover some techniques.
Approaches to transfer file ownership
Share window transfer
In the Google Drive web interface there’s a “Share” window which lets you share files/folders with other users. Once you’ve shared a file with someone, you can select “Transfer ownership” to attempt to move the file to their account.
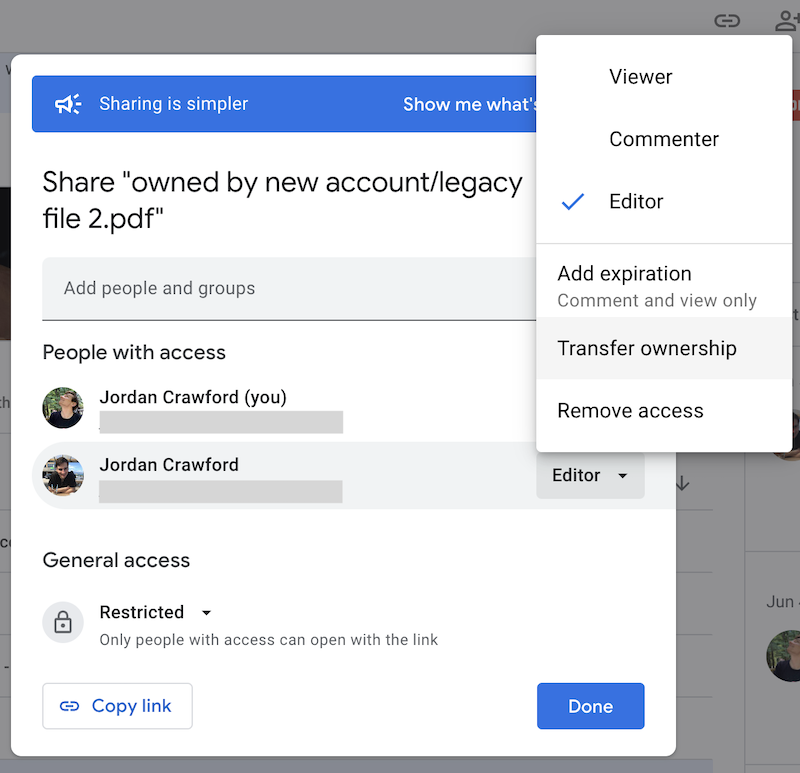
This works great between personal Google accounts or between users within the same Google Workspace organisation, but unfortunately you can’t transfer ownership between a personal and Google Workspace account. If you try, you’ll get a message “Ownership can only be transferred to another user in the same organization as the current owner”.
![A Google Drive message - 'Sorry, cannot transfer ownership to [blanked out]. Ownership can only be transferred to another user in the same organization as the current owner'](/images/moving-google-drive-from-workspace-to-personal/share-window-transfer-owner-not-allowed.png)
😕 We'll need to find a different approach
Copy files via rclone
The most reliable solution to transfer ownership within Google Drive is to copy the file via rclone.
Process
Use the rclone sync (documentation) command to copy a folder from your old Google Drive to your new Google Drive.
e.g.:
rclone sync --transfers 10 --modify-window 1s --verbose --progress --drive-skip-shortcuts old-google-drive:/folder-name new-google-drive:/folder-name
The new options used here are:
--transfers 10- runs more transfers in parallel, you may need to play around with this number to see what works best for you--modify-window 1s- I’ve had problems with rclone’s duplicate file detection taking a long time because modification dates between the files are slightly different between cloud providers (presumably causing it to do more intense checksum checks). By including this option we’re telling rclone that if the file’s modification time is within a second that it’s close enough to be considered the same file.
Advantages
- It works for all files whether you own them or not.
- rclone is re-runnable and very consistent, making it a more trusted option than downloading and re-uploading files.
- rclone can copy Google Docs, Slides and Sheets files so you don’t need to try to convert them to another format.
Disadvantages
- You lose all file history - everything will be created as of the date of copy and by your new user (but the original file modification date is retained).
- Sharing settings are reset so you’ll need to re-share the files/folders with everyone you’d previously shared them with.
- Since the original files still exist, we’re going to need to go through a process to delete the original files (which can be a mission if some files are owned by other people - more on that in step 5!)
Move through a Shared Drive
Shared Drives are a feature only available on the “Business Standard” Google Workspace plan. It’s essentially a shared folder but with the perk that the organisation owns the files rather than an individual user. This means you don’t need to worry about changing ownership of files or adjusting permissions when a user leaves the organisation.
A technique I discovered from ‘How to transfer Drive ownership from Workspace to personal account’ on r/GSuite is that by moving files into a Shared Drive as your old user, then moving them out to your “My Drive” the new user, you’re essentially able to transfer ownership of the files and retain their folder structure.
Process
- Upgrade your Google Workspace plan to “Business Standard” - you can upgrade it temporarily and then downgrade it later - you should only be charged extra for the days you were on the plan.
- Create a Shared Drive and add your new and old account as managers.
- Move some files into the Shared Drive from your old account.
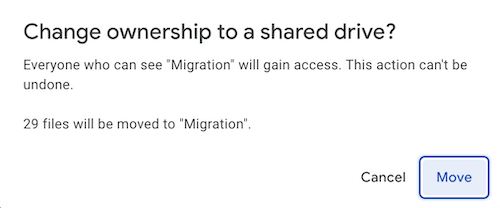
If the files are able to be moved you'll see a confirmation message before starting the move. - Wait for the files to move, then confirm that the files are all present in the Shared Drive.
- From your new account, move the files out of the Shared Drive and into your “My Drive” folder.
- Wait for the files to move, then confirm that the files are all in your new account’s “My Drive” and owned by the new account.
Advantages
- It’s fairly simple and quick.
- It retains all version history of previous file changes.
- It retains previous folder sharing settings.
Disadvantages
- This approach only works for folders where you own all files and folders within the tree structure - you cannot use this approach to move folders where you don’t own all the files.
- If you try to do this you’ll get a message that “xx files can’t be moved because they belong to organizations that don’t allow it”.
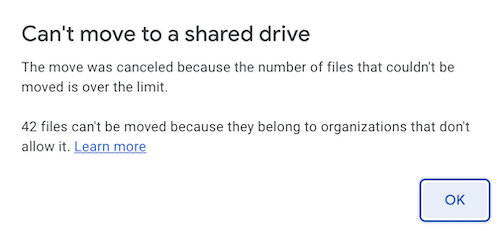
- Sometimes it will actually allow you to move some of the files in the folder, but it’ll leave some files behind if the number of files are below a certain threshold. I opted not to continue in any of these situations as I didn’t want to have to merge the folder structures back together again.
- ⚠️ A big warning with this approach is that you must wait until the folders have been copied to the Shared Drive before moving them out!
- It’s pretty hard to know when the files have moved successfully.
- Sometimes Google Drive would make it look like all the files were there but if I refreshed the page a few times I’d see that they weren’t.
- The other place to check is to search
is:unorganized owner:meto see if there are any files which have become detached from their folders as they move to the Shared Drive. - Using a tool like rclone may be a good way to inspect the directories to ensure that it’s been moved.
-
I made this mistake and got myself into a fairly big mess!
I assumed that if I quickly move a folder into the Shared Drive then move it out that Google will catch up and do some magic in the background to get them to their destination - but sadly, there is no magic!
Moving the folder out of the Shared Drive seemed to stop the files within the folder from moving to the Shared Drive. That meant that I ended up with some folders which were owned by my new account but where the files in those folders were still owned by the old account!
In the old account I found the files by searching for
is:unorganized owner:me. I believe they were considered unorganised because this account didn’t have access to the folders that the files were in.In the new account, I could see the folders but not the files - likely since the files weren’t shared to the new account.
What a nightmare! To get the files showing up again I shared the folders from the new account to the old account. This meant the old account could see the folders these files belonged to (even though the new account still couldn’t see them). This mess was pretty hard to fix and I decided the best course of action was to fall back to the rclone approach and make a new copy of the old files to move from the old account to the new account.
Despite this experience, I’m still a fan of this approach as it has many advantages - it just must be used with care.
- It’s pretty hard to know when the files have moved successfully.
Making the transfer
With those approaches out of the way - let’s get ownership of your files moved to the new account.
I took a hybrid approach, using a different solution based on the structure of each folder. Go through your Google Drive folders and figure out which ones fit into each of the below buckets.
Bucket 1 - Folders completely owned by me
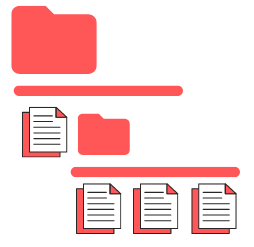
These are folders where all the files (and files within all sub folders) are all owned by me. They might be shared with other Google Drive users but no other users own any of the files.
This situation is perfect for the Shared Drive transfer method as it’s simplest and ensures any files shared with other users will retain their sharing settings.
The best way to tell if a folder is fully owned by me is to try and move it into the Shared Drive - Google Drive will tell you if there are ineligible files (i.e.: files owned by other users).
Bucket 2 - Folders shared with me but I don’t own any files within
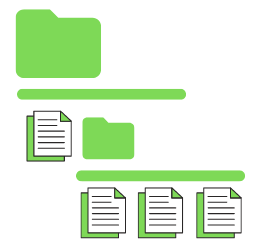
These are folders which don’t belong to me at all, and where none of the files within the structure are owned by me at all.
If I have edit permissions
- Share these files with my new account.
- From my new account, remove my old account from the sharing list.
If I don’t have edit permissions
- I’ll need to ask the owner to add my new account to the list.
- Or, if I don’t care about collaborating with others and just want the files then clone them with rclone!
Bucket 3 - Folders which are a combination of owned by me and owned by another user
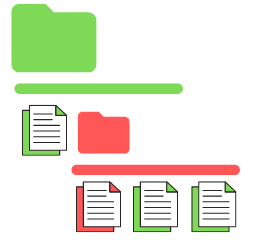
These are folders where some files/folders within the hierarchy are owned by me and some aren’t. It doesn’t really matter whether I own the folder itself or not, the key thing is that we’ll need to transfer ownership of the files I own.
This is one of the more difficult situations and the approach here will depend on the folder structure.
If you only own a few files
The Shared Drive approach should be sufficient when you only own a few files within the folder.
You won’t be able to move the entire folder through the Shared Drive (as the files must be fully owned by you to do this) but you can move individual files/folders which you own through the Shared Drive and back into the folder after transferring ownership.
If the ownership structure is complex
If the folder contains many other folders which contain files owned by both you and other users it becomes unrealistic to manually move sets of files through the Shared Drive approach.
Instead, you’ll want to use the rclone approach to create a fresh copy of the folder which your new account owns, then share the new copy of the folder to the other users.
We’ll need to delete the old folder in a safe way too - it’ll be important we follow Step 5 - Clean-up.
Step 4 - Verification
We’ve done quite a lot of file operations and there’s a chance there’s something that’s been forgotten. I like to be sure that the before and after is the same by performing some verification.
We can use our rclone backup from earlier to compare with the files that are sitting in your new Google Drive.
To do this I used a command like this:
rclone sync --drive-skip-shortcuts --modify-window 1s --dry-run --no-update-modtime /local-backup-destination new-google-drive:/
The new options used here are:
--dry-runensures no syncing actually happens but we just get a log message to say what operations it would need to do to keep it in sync.--no-update-modtimeprevent messages that it would update the modification time as we know that we may see slight differences in modtime.
Once you run the command, if you see no log messages about work which needs to be performed then the directories are exactly the same!
If you see a message about it wanting to add a file, then that means there’s something which was in your backup but isn’t in your Google Drive - is there something you’ve missed?
Example log output for a file which was missing from the new account:
2022-07-18 04:48:39 NOTICE: file.png: Skipped copy as --dry-run is set (size 241.251Ki)
If you see a message about it wanting to delete a file, then that means there’s something which was in your new Google Drive but not in your backup - is there anything extra you’ve added that you’d expect? Or is something sitting in a different location to where it used to be?
Once you’re happy that everything is consistent, it’s time to move on to clean-up!
Step 5 - Clean-up
As mentioned above, when you delete files owned by someone else they’ll end up in their root “My Drive” folder.
If you’ve made copies of any folders which contained files owned by another user (and you’ve re-shared the new copy of the folder with those users) then we’ll need to take care deleting the old folder. If we’re not careful, when we delete the old folder a bunch of files will end up in the “My Drive” folder of other users, causing confusion and making a massive mess.
I found that when you delete a folder, if you own the folder, Google Drive will delete all the files and folders in the top level of the folder but it doesn’t appear to recurse subdirectories. If I deleted a folder which I didn’t own then the entire folder went to the owners “My Drive” folder.
The approach I took to delete the old folder without causing a mess is:
- Flatten the entire shared directory structure so that all files are contained within a single folder (i.e.: no nested hierarchy). Importantly, the folder must be owned by the other user. See below for more information on getting a flat structure.
- Get the other user to delete the folder. It’ll go to the Trash.
- Get the other user to open their Trash, right click the folder and choose “Delete Forever” to instantly start deleting the files. Because they own the folder, all the files they own within the folder will actually be deleted and files owned by your old account will go to “My Drive” (littering “My Drive” isn’t a concern since I’ll be deleting my account).
A limitation of this approach is that it won’t work when there are multiple owners. In this situation you’ll need to segment the files into separate folders for each user to delete their files separately.
My approach to get a flat structure was a bit messy and there’s likely more elegant solutions. What I did was:
- I used rclone to get a recursive list of the directories in the folder, e.g.:
rclone lsd -R old-google-drive:"/folder/" > raw_directories.txt - Next, in my editor (Visual Studio Code) I cleaned up the file result and appended a rclone move command, e.g: made each line look like below:
rclone move -v old-google-drive:"/folder/folder-sub-dir" old-google-drive:"/folder/to-delete" -
The
rclone lsdoutput lists from least to most specific in the hierarchy. If we move files in this order it’ll result in sub directories being moved to the deletion folder which we don’t want for our flat structure.I solved this by reversing the order of the file so that it’d go from most to least specific. I used
tail -r to_run.sh > to_run_reversed.shto reverse the set of commands. - I made the script executable with
chmod +x to_run_reversed.shthen ran the script and left it to do it’s thing. - The command
rclone ls old-google-drive:"/folder/"can be used to list all files and verify that the file structure is now flat.
Congratulations, you’ve made it to the end! It’s a painful process but once it’s done, it’s done!
Hopefully Google makes this an easier process in future - the removal of some frustrating restrictions around transferring files would go a very long way.
