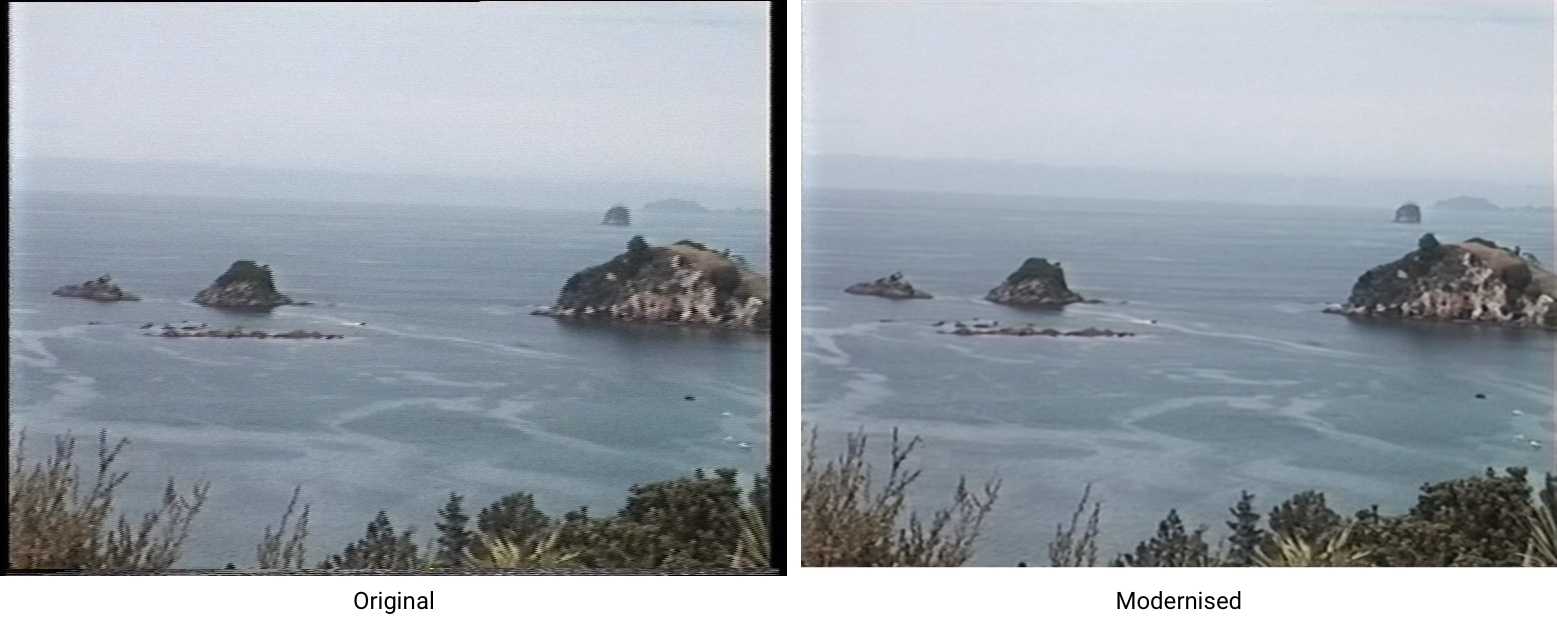
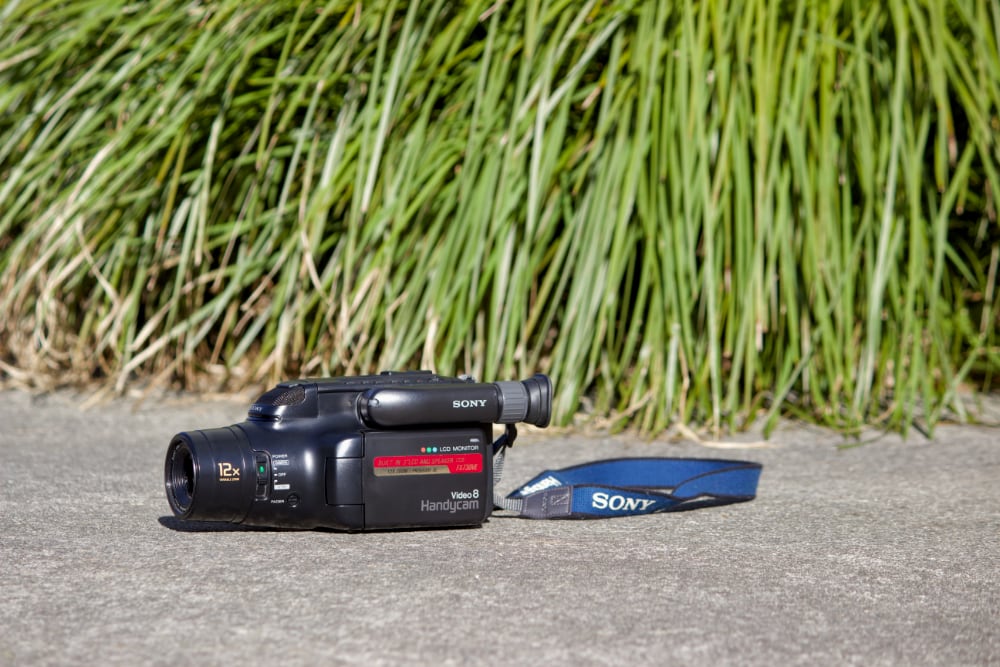
In my previous article, I discussed the process I went through to digitise my family’s Video8 tapes to produce a high-quality archive. The files were quite large, interlaced, low-resolution, and had messy borders. I wanted to process the video further to produce a modern file that will work consistently in players for years to come.
It’s worth noting that we’re not aiming to replace the archive footage; we’re simply creating a more modern version of it, which is easier to play and watch. These processing steps are a bit of an art, and the technology changes over time. In 20 years’ time, you might decide to make different choices and process the footage differently.
Here’s what we’re working towards today:
| Archive | Processed | |
|---|---|---|
| Bitrate | Overkill 25 Mb/s (H.264) | Efficient ~6.5 Mb/s (H.265) |
| Resolution | 720x576 with messy edges | 1440x1080 with cropped edges |
| Pixel aspect ratio | Wide pixels (1.09 PAR) | Square pixels (1.0 PAR) |
| Frame rate | 25 frames/s interlaced (50 fields/s) | 50 frames/s progressive |
| Colourspace | Rec. 601 colour (SD standard) | Rec. 709 colour (HD standard) |
| Audio | 320 kb/s AAC audio | 320 kb/s AAC audio |
Contents
- Background
- Stage 1 - Trimming and clipping footage
- Stage 2 - Deinterlacing, cropping and upscaling
- Stage 3 - Re-encoding and changing colourspace
- Stage 4 - Chaptering
- Stage 5 - Sharing
- Conclusion
Background
Why is deinterlacing required?
If you’d like to learn more about interlacing, see my previous article.
Nowadays, virtually all modern displays are progressive. These screens are capable of changing pixels essentially instantaneously without a scan. This means that if you play back interlaced footage on a modern display, you’ll see both fields of the video at once. When there is fast motion, you’ll notice lines caused by seeing both fields simultaneously.
To prevent this effect, we need to deinterlace the footage and turn it into progressive video.

Why do we need to crop?
I’d like to provide a bit more context - if you’d prefer it in video form, this Technology Connections video explains the below excellently.
Understanding Blanking Intervals
In part 1, I mentioned that PAL has 625 lines, but only 576 are visible. The remaining invisible lines are known as the Vertical Blanking Interval (VBI).
This contains a sync signal which tells the electron beam to switch off and fly back to the top of the screen at the end of the field. This gives time for the beam to physically make this move before the next field starts.
Remember: analog video broadcasts are the way they are because of how CRT televisions work. There isn’t some fancy circuitry caching the signal while the electron gun moves; the broadcast is directly controlling the electron beam and needs to allow time for it to move.
Similarly, at the end of each line there’s an invisible Horizontal Blanking Interval (HBI) which tells the electron gun to snap back from right to left (and to give it time to physically move).
The good news is that blanking intervals aren’t something we need to worry about with our digitised footage - they’ve been filtered out already and were used to signify the end of each line (HBI) and field (VBI).
Understanding Overscan
Despite the blanking intervals in the ‘invisible’ part of the signal, the active picture still doesn’t fill the entire visible part of the signal. This is because CRTs have Overscan - the TV crops out about 5-10% of the visible part of the signal.
Overscan is essentially a margin of error to allow for glitches in broadcast, differences between TVs and other things which can impact the electronics like heat and age. Broadcasts have ‘safe’ regions - where if you want something to be reliably visible on TVs it needs to be within these regions of the screen.
How this applies to our footage
Like any analog signal, the active picture region of your Video8 tape does not fill the entire visible region of the broadcast. If we played this back on a CRT TV, you would never notice because of overscan, but now that we’ve digitised the entire visible region, we see it all!
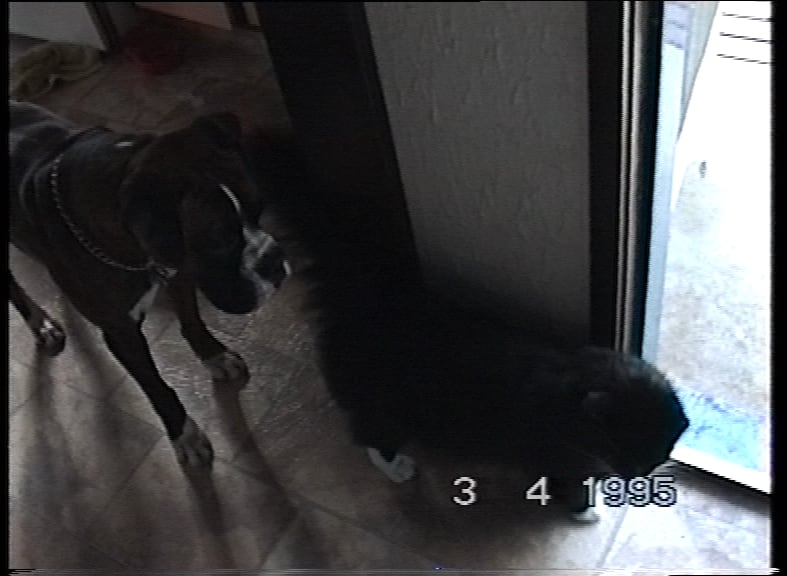
So what are we seeing:
- On the left and right of the screen you’re seeing black bars caused by blank regions at the end and start of each line.
- On the top you may see a thin black bar which is blank regions at the start of the field.
- On the bottom you’ll see Head Switching Noise which are some lines created by VHS playback.
It’s good news that we can see this stuff - it means we’re not missing any detail from the original tape - we’re getting every single line of visual information from the tape.
We want to crop the edges of the video to just the active picture region to produce a clean output.
Understanding Pixel Aspect Ratio (PAR)
This BAVC Media article is excellent at explaining this.
Basically - Rec. 601 is the standard which defines how SD video is digitised. It specifies that luminance is sampled at a 13.5MHz frequency which results in a width of 720px.
For NTSC this results in a 720x480px resolution which is a 3:2 aspect ratio, and for PAL this results in a 720x576px resolution which is a 5:4 aspect ratio. If we played the footage back using square pixels we’d get a squished image - NTSC footage appears too fat so needs ‘tall’ pixels, and PAL footage appears too thin so needs ‘fat’ pixels.
As a result, we need to use non-square pixels. The Pixel Aspect Ratio (PAR) is the aspect ratio of the pixels, impacting how the video is played back. This is embedded as metadata in the file.
You can use ffmpeg to find this:
> ffprobe -v error -select_streams v:0 -show_entries stream=width,height,sample_aspect_ratio,display_aspect_ratio -of default=noprint_wrappers=1 41367.mp4

width=720
height=576
sample_aspect_ratio=787:720
display_aspect_ratio=787:576
In my case, it ended up a little bit different to the numbers in the BAVC Media article - but let’s break this down:
- The Storage Aspect Ratio is 720:576 (5:4).
- This just comes from the width and height of the footage.
- The Display Aspect Ratio is 787:576 (~1.36).
- This is approximately 4:3 (~1.33)
- This tells players the footage should be displayed as an (approximately) 4:3 image.
- The Pixel Aspect Ratio (which ffmpeg calls
sample_aspect_ratio) is 787:720 (~1.093)- This is approximately the 59:54 ratio (~1.0925) from the BAVC Media article.
- We can interpret the PAR as the amount we need to stretch the width by when displaying it. This means our 720px width needs to be stretched by 787/720 to be effectively displayed as if it was 787px.
Modern video uses square pixels, and some players do not handle non-square pixels correctly. As a result, when we crop and upscale the footage, we should take this opportunity to convert it to square pixels.
Why do we need to upscale?
I decided to upscale my footage to 1080p, which in the 4:3 aspect ratio is 1440x1080 pixels.
There are a few reasons to do this:
- It can help smooth our jagged lines where a straight line might appear as stair steps due to low resolution.
- While most players will do this anyway, it means we don’t need to rely on the playback device to upscale the footage; we can upscale it in a way we prefer instead.
- It lets us crop the edges of the video while maintaining a standard resolution.
- It pairs nicely with our process to switch to square pixels.
- When compressing the footage, it’s less likely to wipe out detail when there’s more pixels to work with.
Understanding colourspaces
Our old Video8 footage uses the old Rec. 601 standard and colourspace. Newer HD video files generally use the Rec. 709 standard instead. Because we’re upscaling the footage to 1080p, we should transform our colourspace to the more modern Rec. 709 standard for broader compatibility.
We’ll need to apply a transformation to the colour values to remap each pixel’s colour to Rec. 709; more on this below.
Stage 1 - Trimming and clipping footage
My family’s footage was pretty simple: it was just 10 tapes from a distinct time period. Most of the footage was a few minutes of clips recorded every few days or a few times a month, mostly around home. I wanted this footage to stay together, however, the more I looked at it, the more I felt some parts deserved to be split out separately.
My rule is a bit fuzzy, but I basically separated any special events, family trips, or anything else that needed significant editing. For example, my parents’ wedding, my grandad’s 50th birthday, a family holiday, and school assemblies all felt appropriate to split out.
The key thing is that you want to cut the footage losslessly, because each time you re-encode it you lose quality. I used Lossless Cut for this, but you can also do this with direct ffmpeg commands.
Note that tools like Lossless Cut are only lossless because they cut against keyframes in the video. Generally, these seem to align with new scenes in the footage, but sometimes you see a slight flash of a different scene in the clipped footage.
Process
- Open the file in Lossless Cut.
- Identify all the normal (combined) segments and segments you want cut-out.
- The “Seek previous keyframe” and “Seek next keyframe” buttons are helpful to identify the correct frame to splice.
- If there is a black screen at the start of the footage, start your first segment when the footage begins for a clean cut.
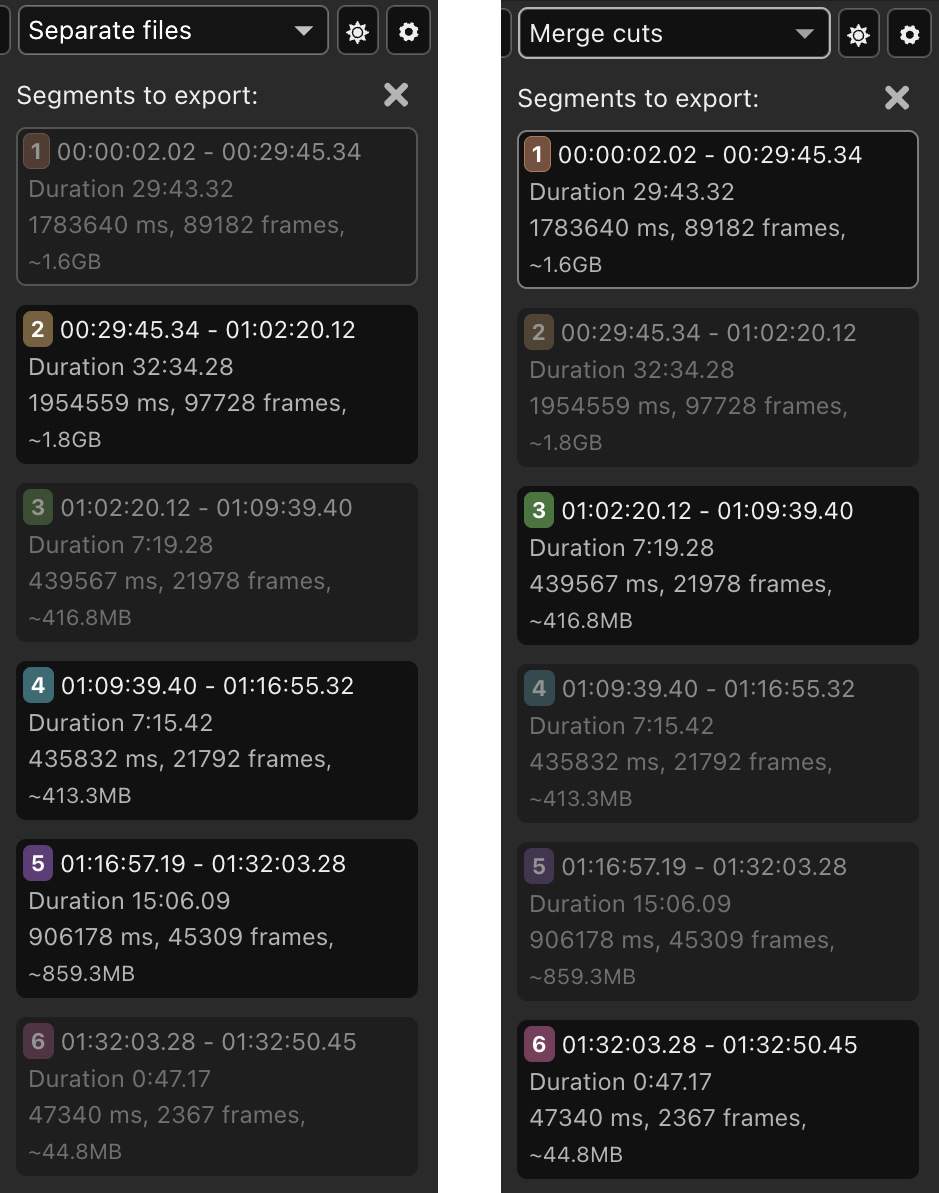
- In the sidebar, select only the clipped regions and export these as individual segments with the “Separate files” mode
- These will be your individual split-out clips.
- In the sidebar, select the remaining regions to combine, and export these as one combined file with the “Merge cuts” mode.
- This will create a file of all remaining bits as one big file.
Stage 2 - Deinterlacing, cropping and upscaling
De-interlacing algorithms
There are a variety of approaches to this problem as detailed in this Larry Jordan video.
These essentially boil down to three main approaches:
- Just drop half the resolution (not ideal, loses detail)
- Frame blending - creating a new frame which is both fields dissolved together
- Frame interpolation - creating new frame(s) by guessing what we should see based on motion.
Software de-interlacing algorithms are pretty good in 2026, so we’re going with a smart frame interpolation approach.
This article provides a lot of background and compares many algorithms. I didn’t want to go with any sort of generative AI approach (i.e. inventing new detail), and I didn’t have access to tools such as DaVinci Resolve Studio, so I went with the popular community-driven QTGMC algorithm.
Using Hybrid for video processing
QTGMC is a deinterlacing script for AviSynth and VapourSynth - both are powerful open source video processing tools. However, to keep things simple, I used a tool called Hybrid for video processing.
Hybrid is a GUI for AviSynth and VapourSynth, making it a lot easier to work with. Hybrid runs best on Windows so I used my gaming PC for this process.
I’ll walk through my process below - but for a general overview of the tool I found these two videos helpful:
- Hybrid: a guide for beginners - Enhance and upscale your camcorder footage - this one works through a mini DV and analogue capture example.
- Deinterlacing and Upscaling with Vapoursynth in Hybrid - goes into detail on many of the advanced options in Hybrid.
Experimenting with Hybrid settings
It takes a bit of trial and error to get the settings you’re happy with.
Often the best way to check them is just to process a small clip of video. If your clip is too long, in “Config” -> “Internals” there’s a “Cut Support *experimental*” option which lets you specify the end time of the footage.
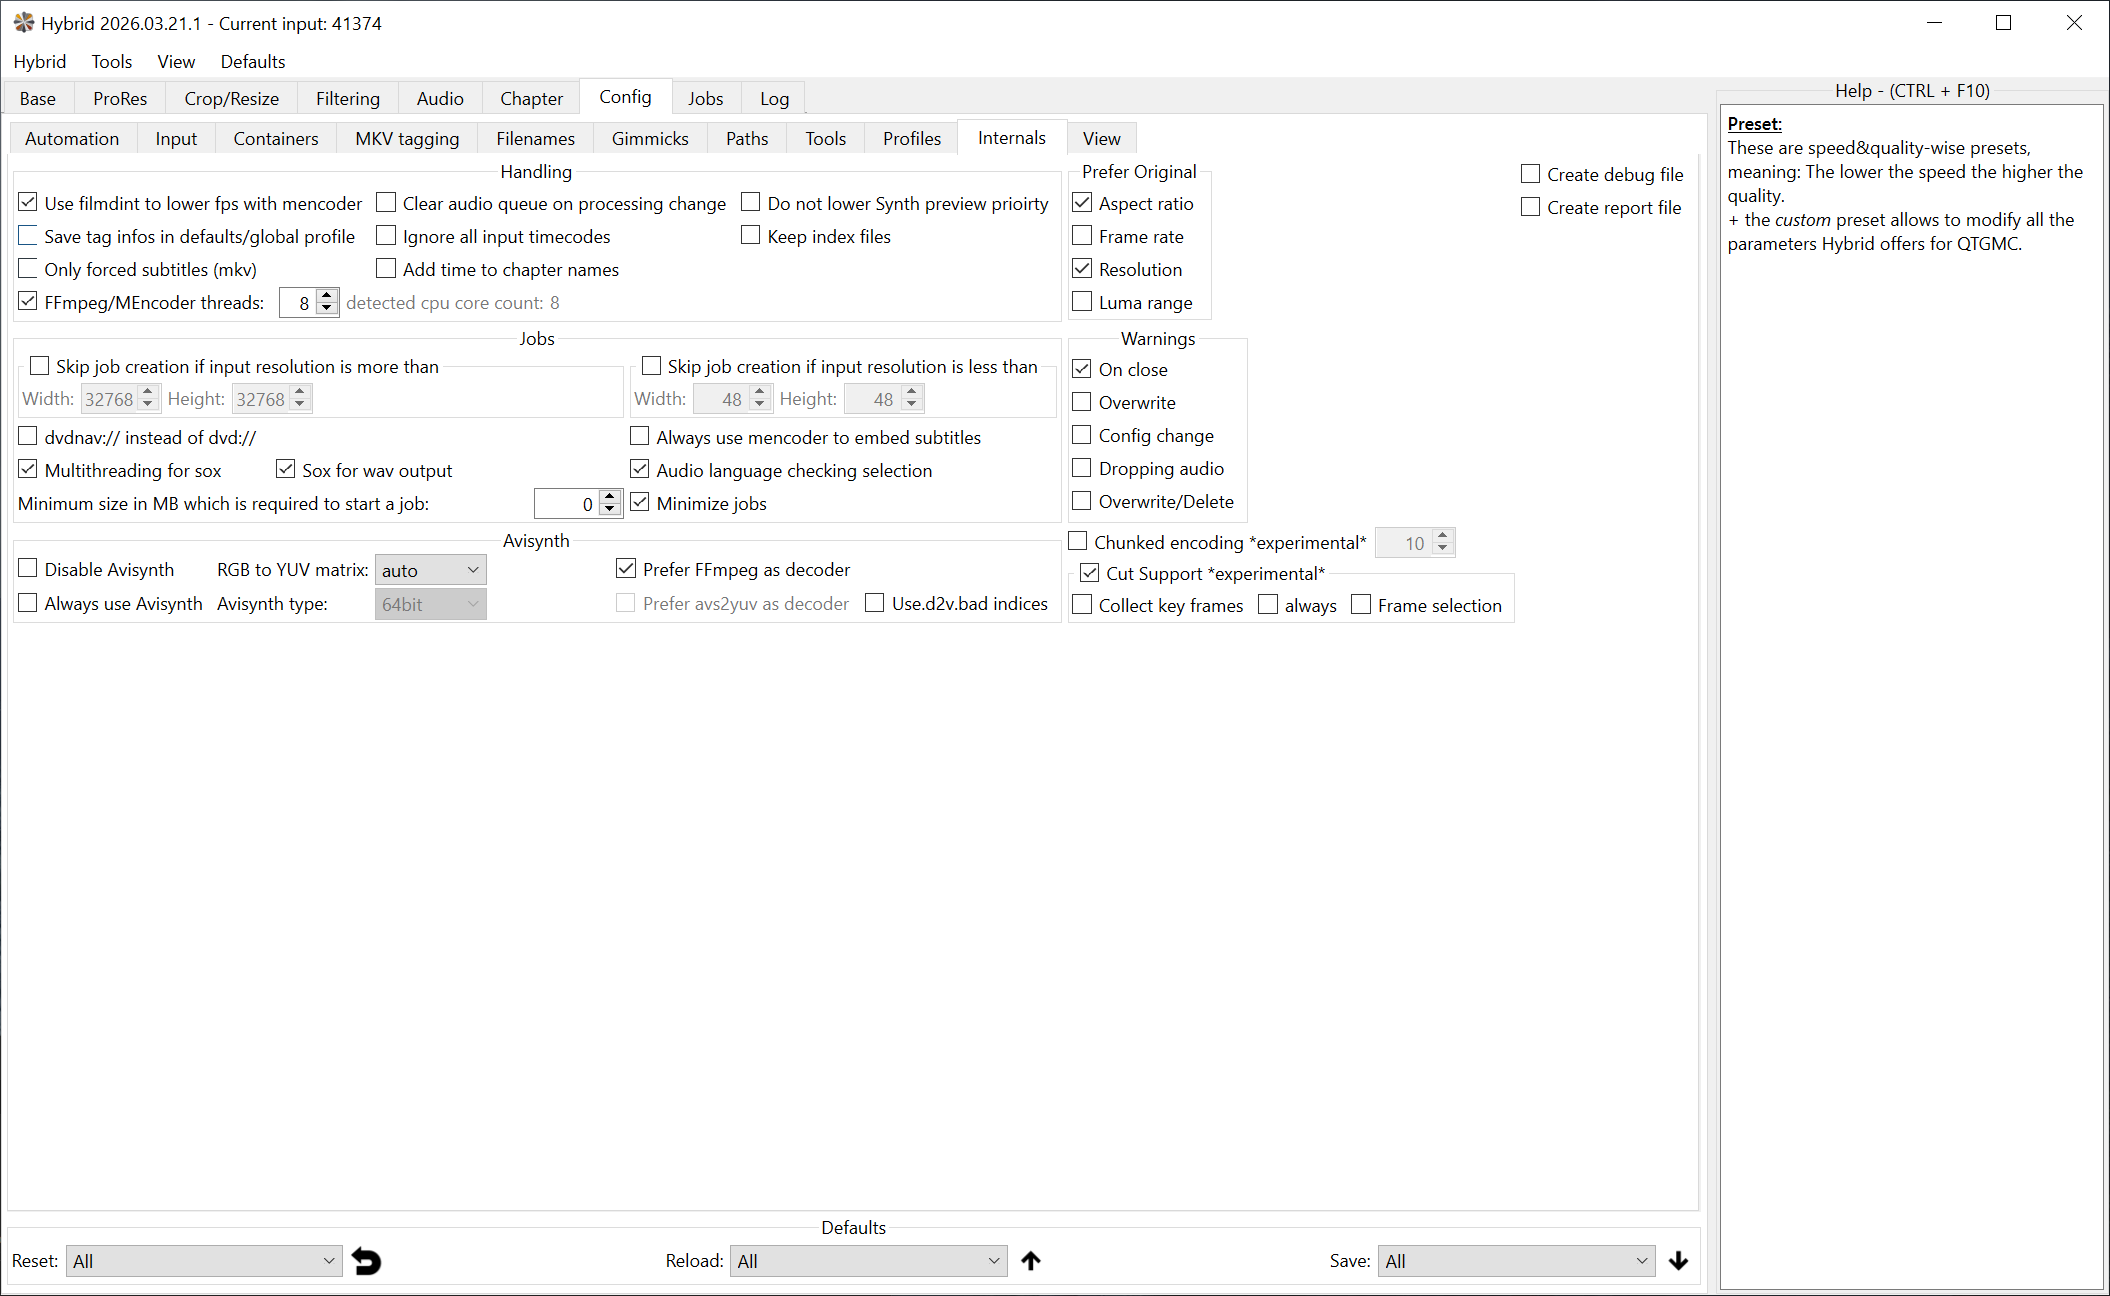
I found this option to behave a bit weirdly so I wouldn’t recommend it for your proper processing pass, but it’s good enough if you just want to see what a specific part of the clip looks like.
My settings
These are the settings that worked for me.
Base Tab
- Open the input file (your archival footage, or clip)
- Set the “Video” option to “ProRes”
- ProRes creates massive visually lossless files - this means we’re not introducing any digital compression in this process.
- Set the “Audio” option to “Auto add (first)”
- In other words, add the first audio track to the output file
- Choose an output file path.
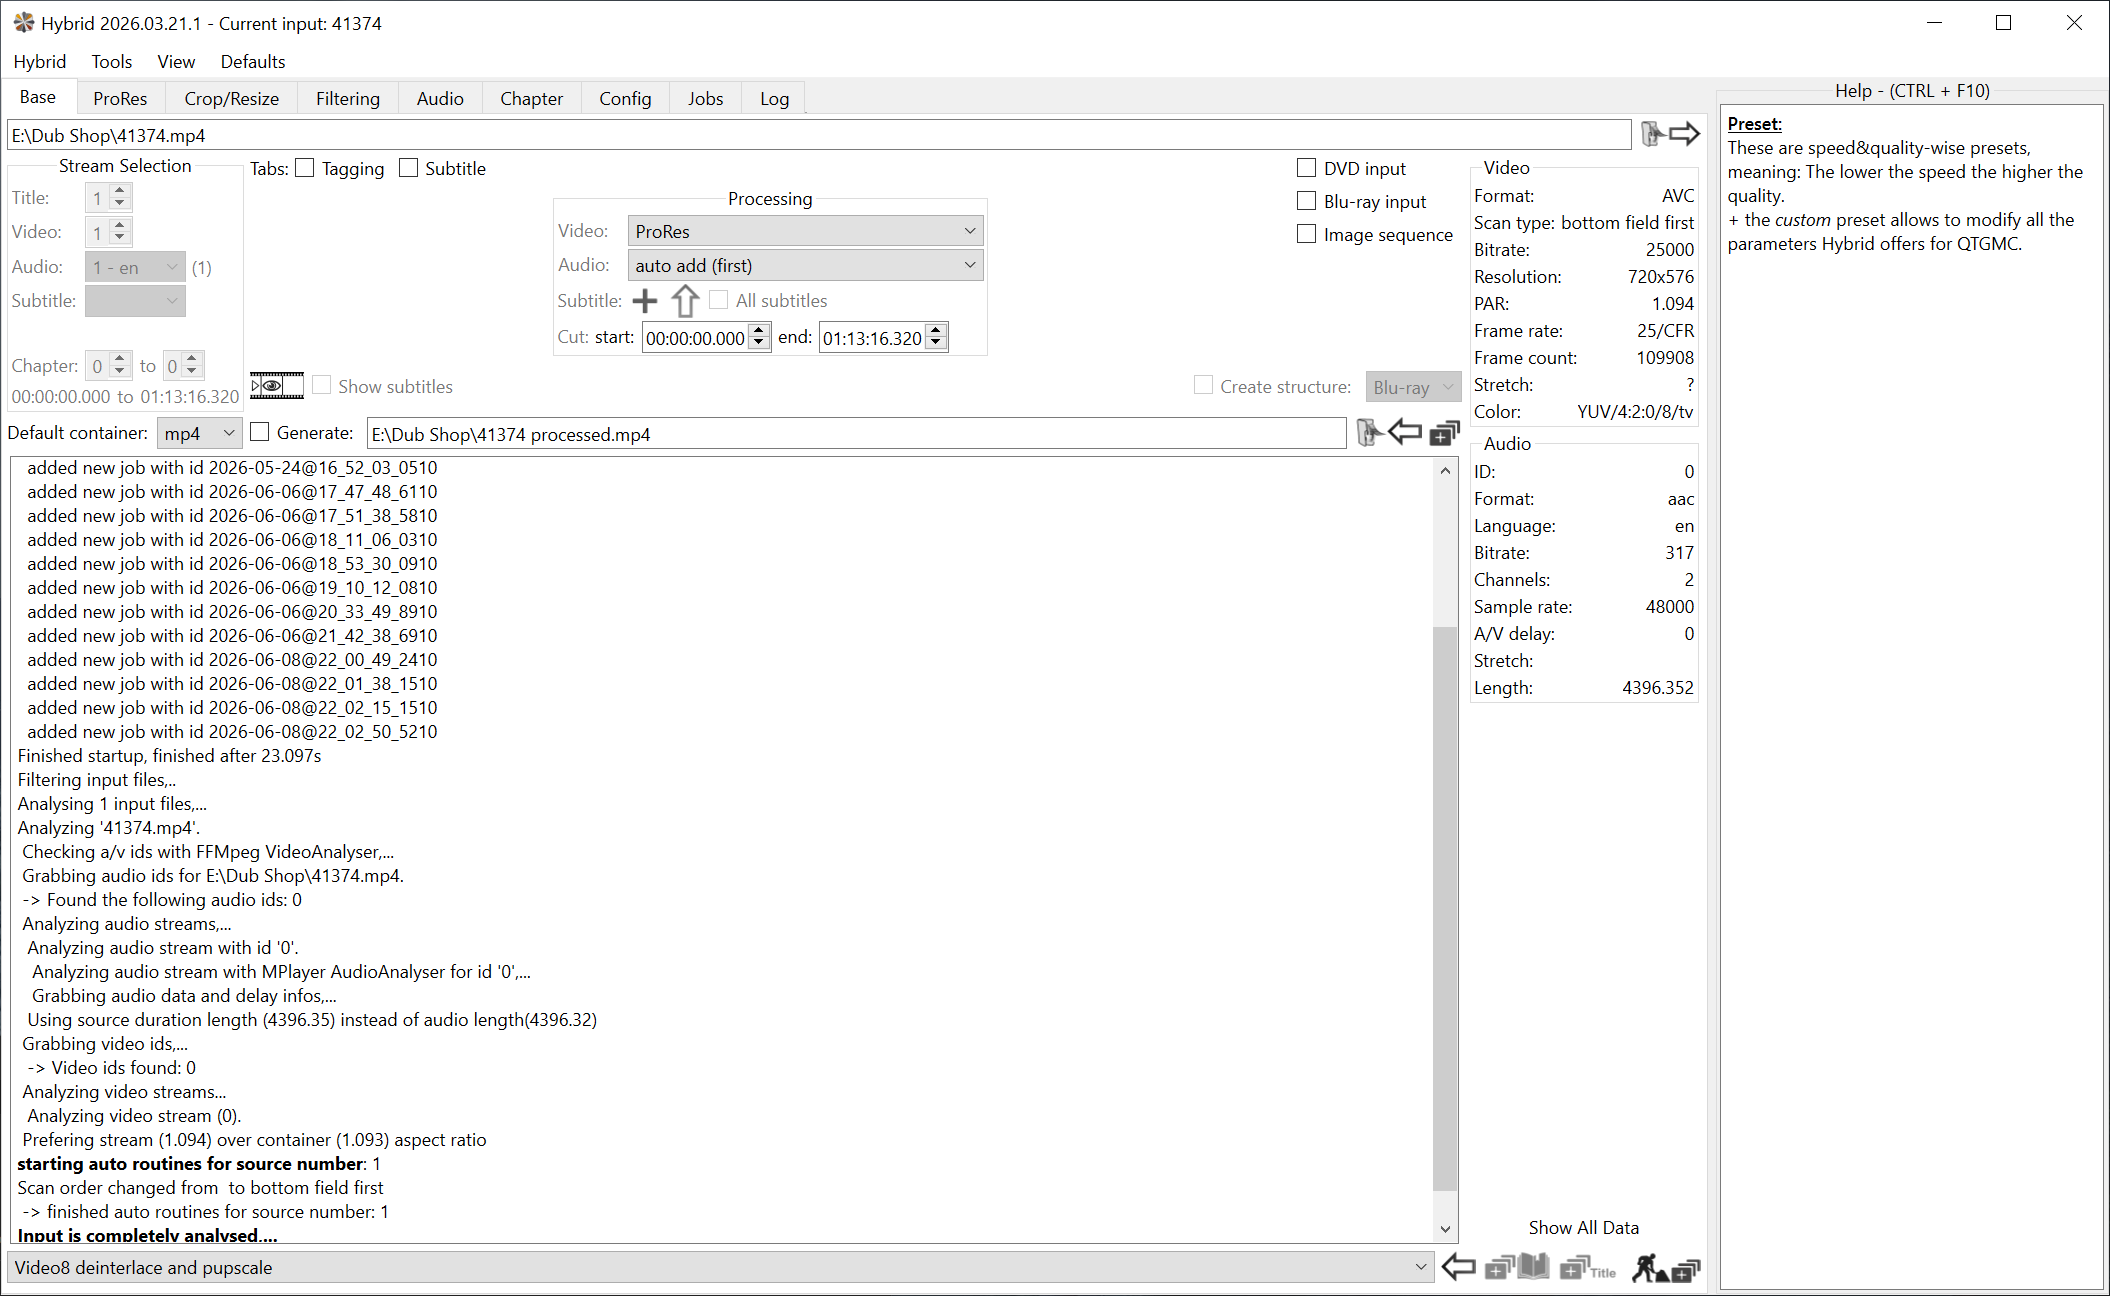
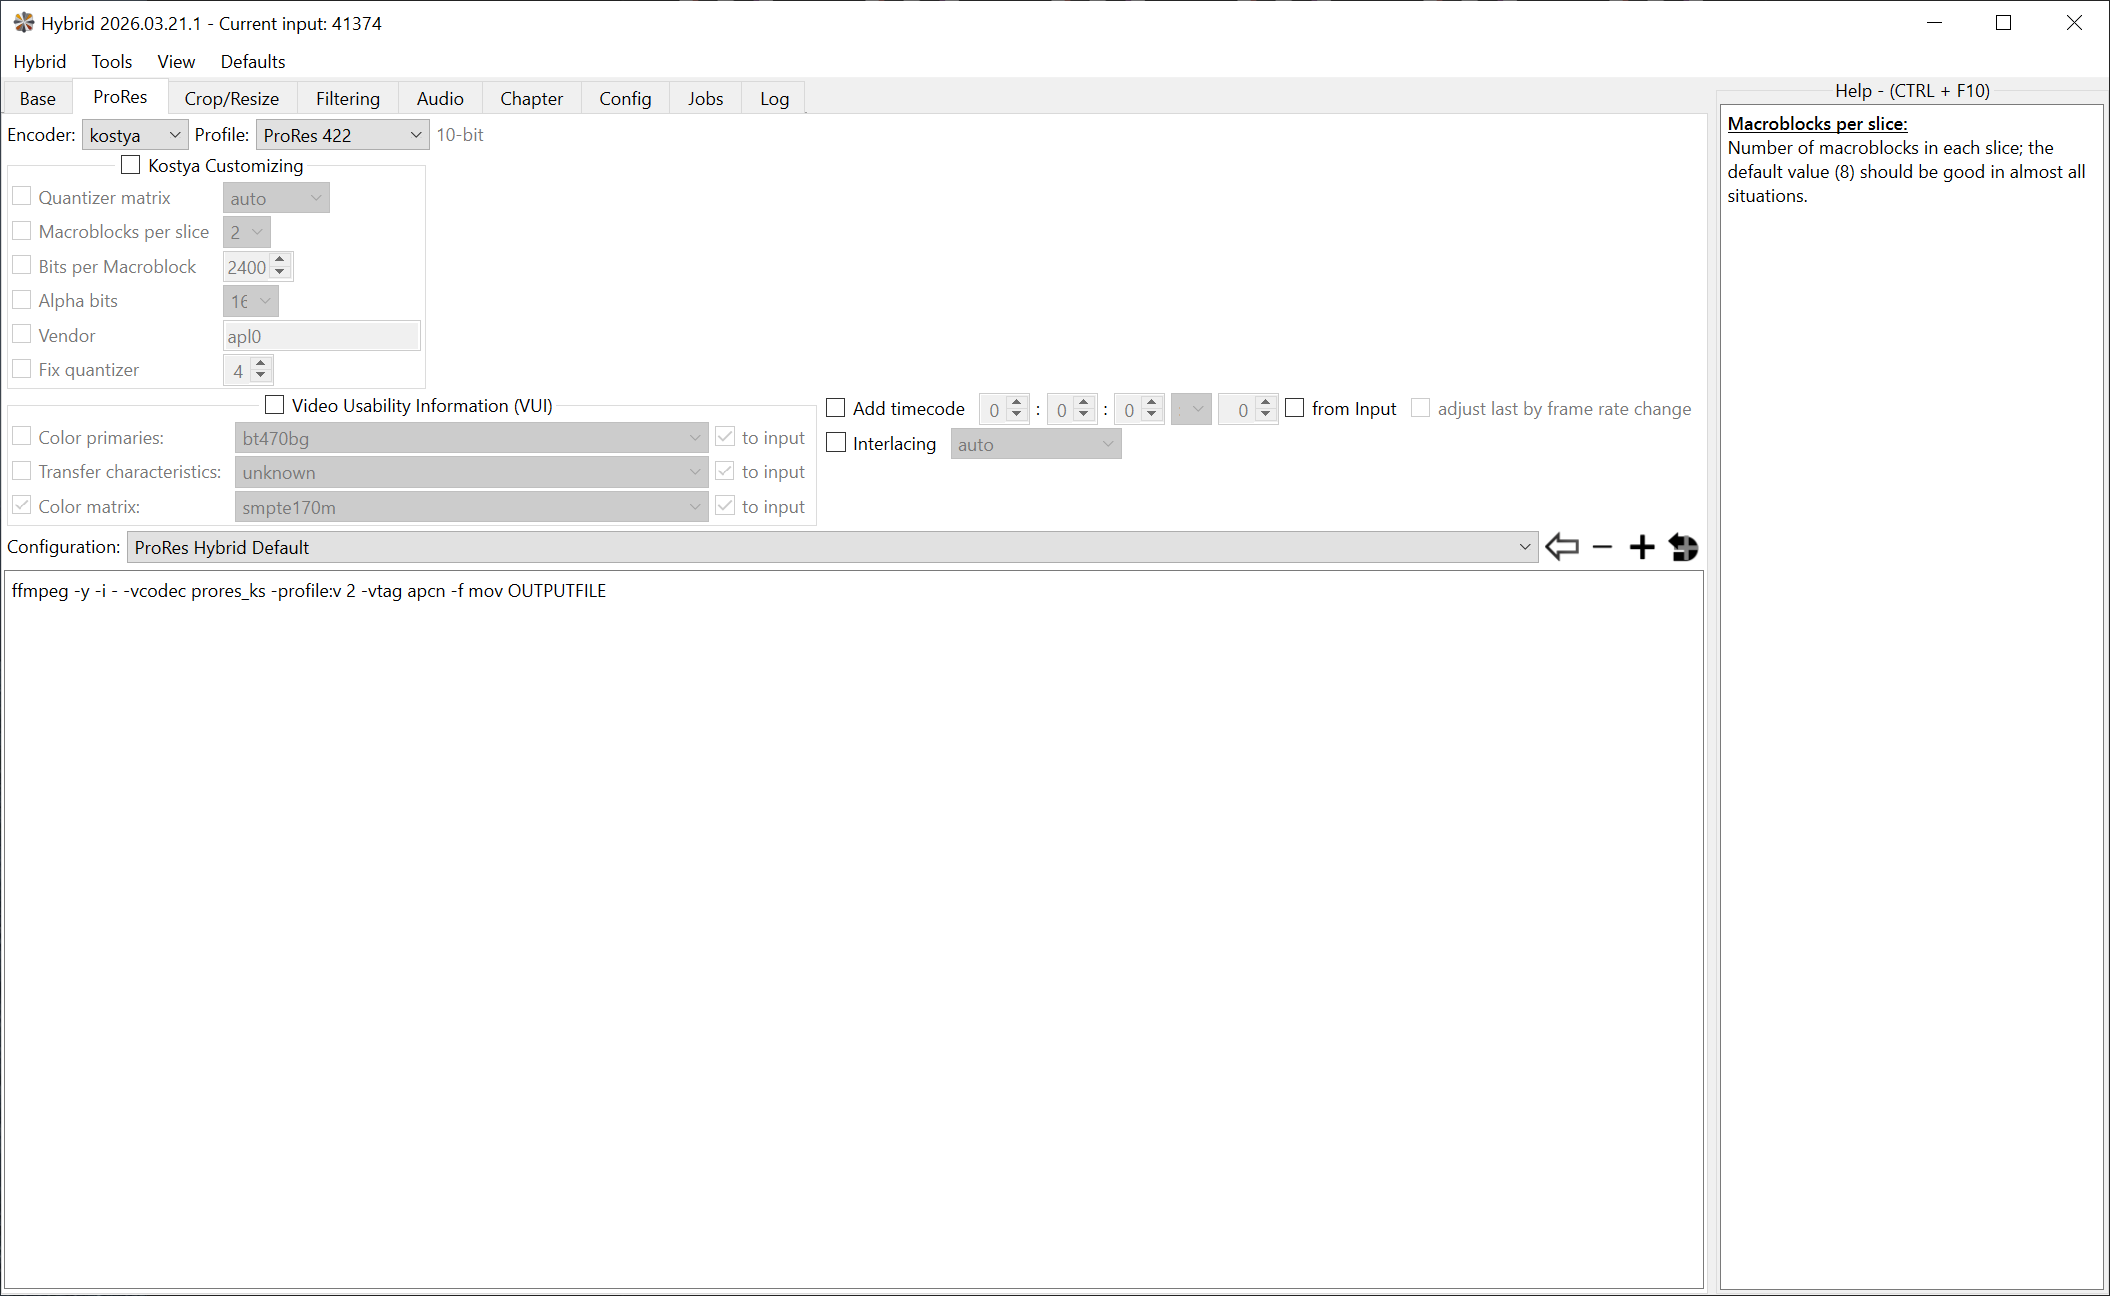
ProRes Tab
Set the “Profile” to “ProRes 422”. The Proxy option is lower quality so we just want the normal ProRes 422.
Crop/Resize Tab
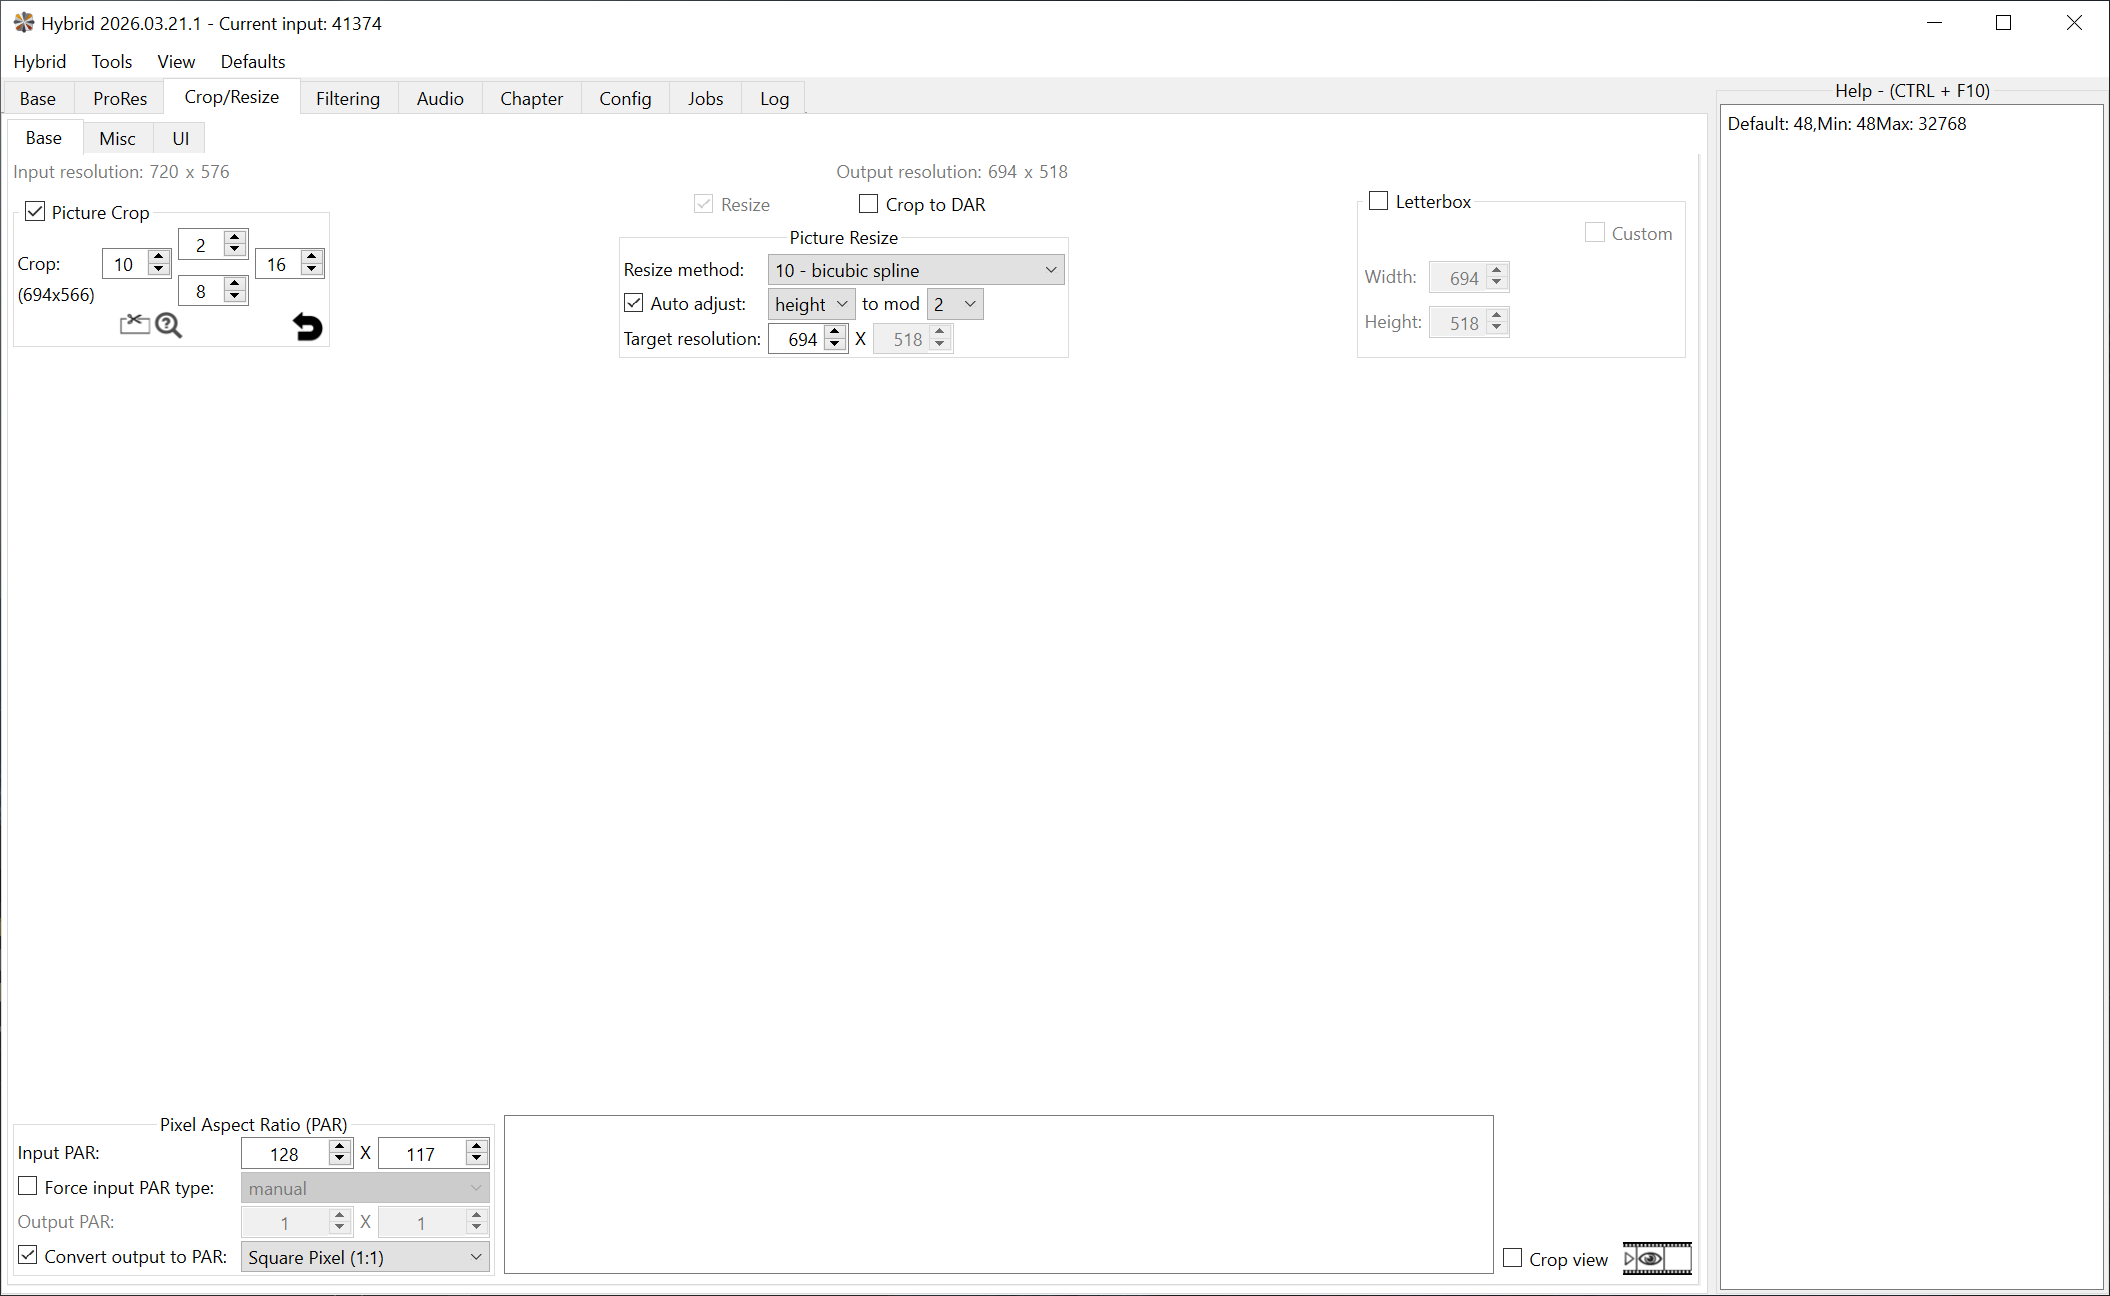
We’re going to crop the video and upscale it to 1080p with square pixels. We start with a 720x576px input resolution.
- Set the “Picture Crop”
- There’s a preview available in Hybrid, but I actually found it easier to use Handbrake to preview a crop and bring those settings in.
- This will vary on your footage, but for me, the right border was bigger than the left.
- The crop I used was:
- Top (chops blank line and partial line at the top): 2px
- Right (chops black border): 16px
- Bottom (chops Head Switching Noise): 8px
- Left (chops black border): 10px
- After this, I was left with an output resolution of 694x566.
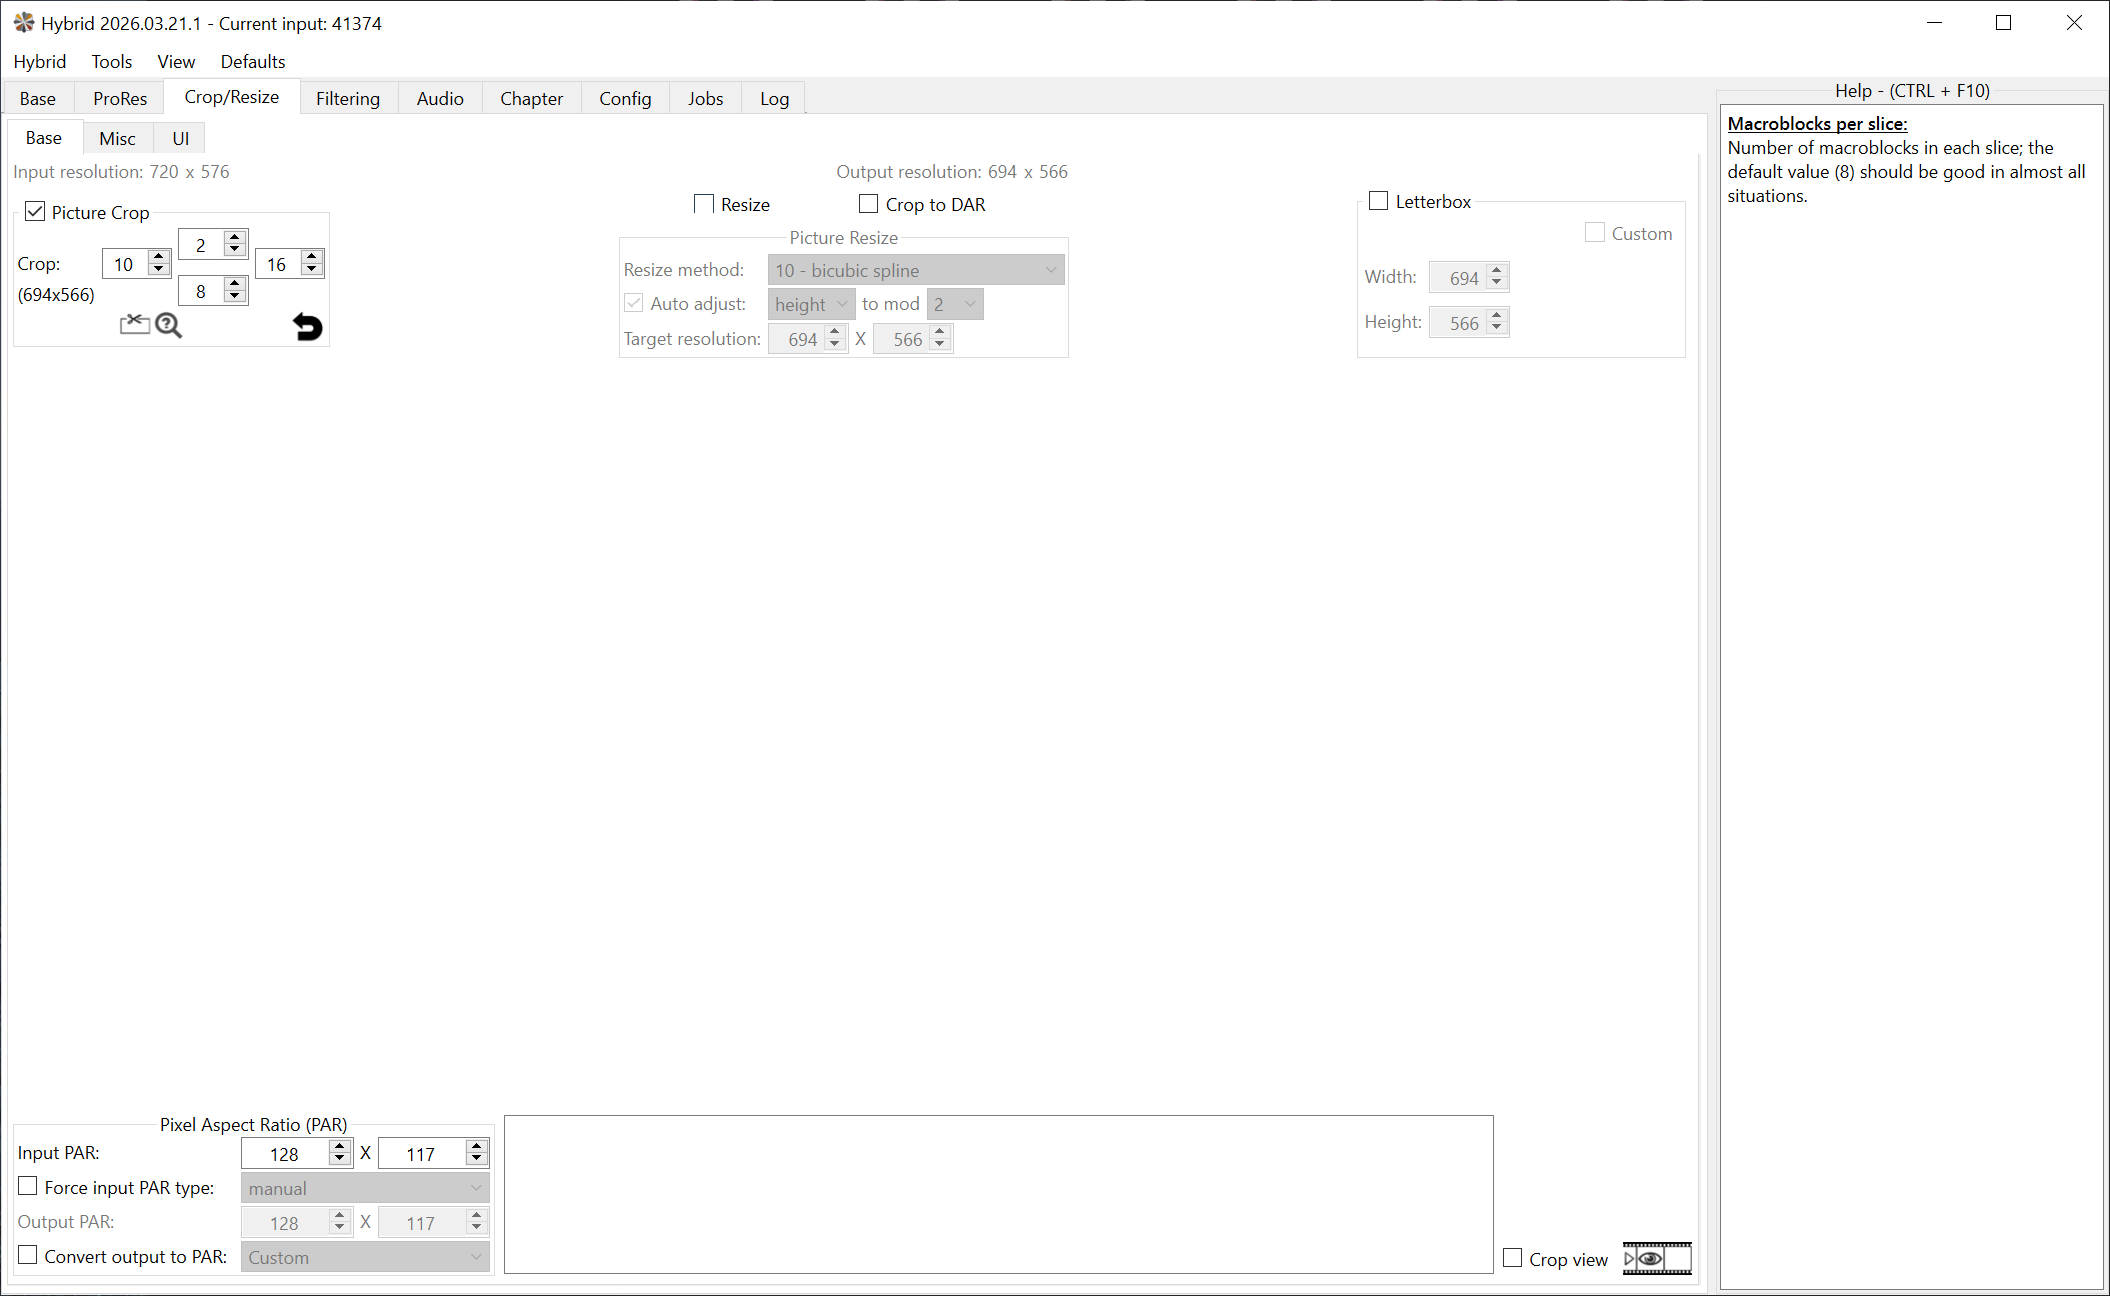
- Use the “Convert output to PAR” option to convert the pixel aspect ratio to “Square Pixel (1:1)”
- After this I was left with an output resolution of 694x518px
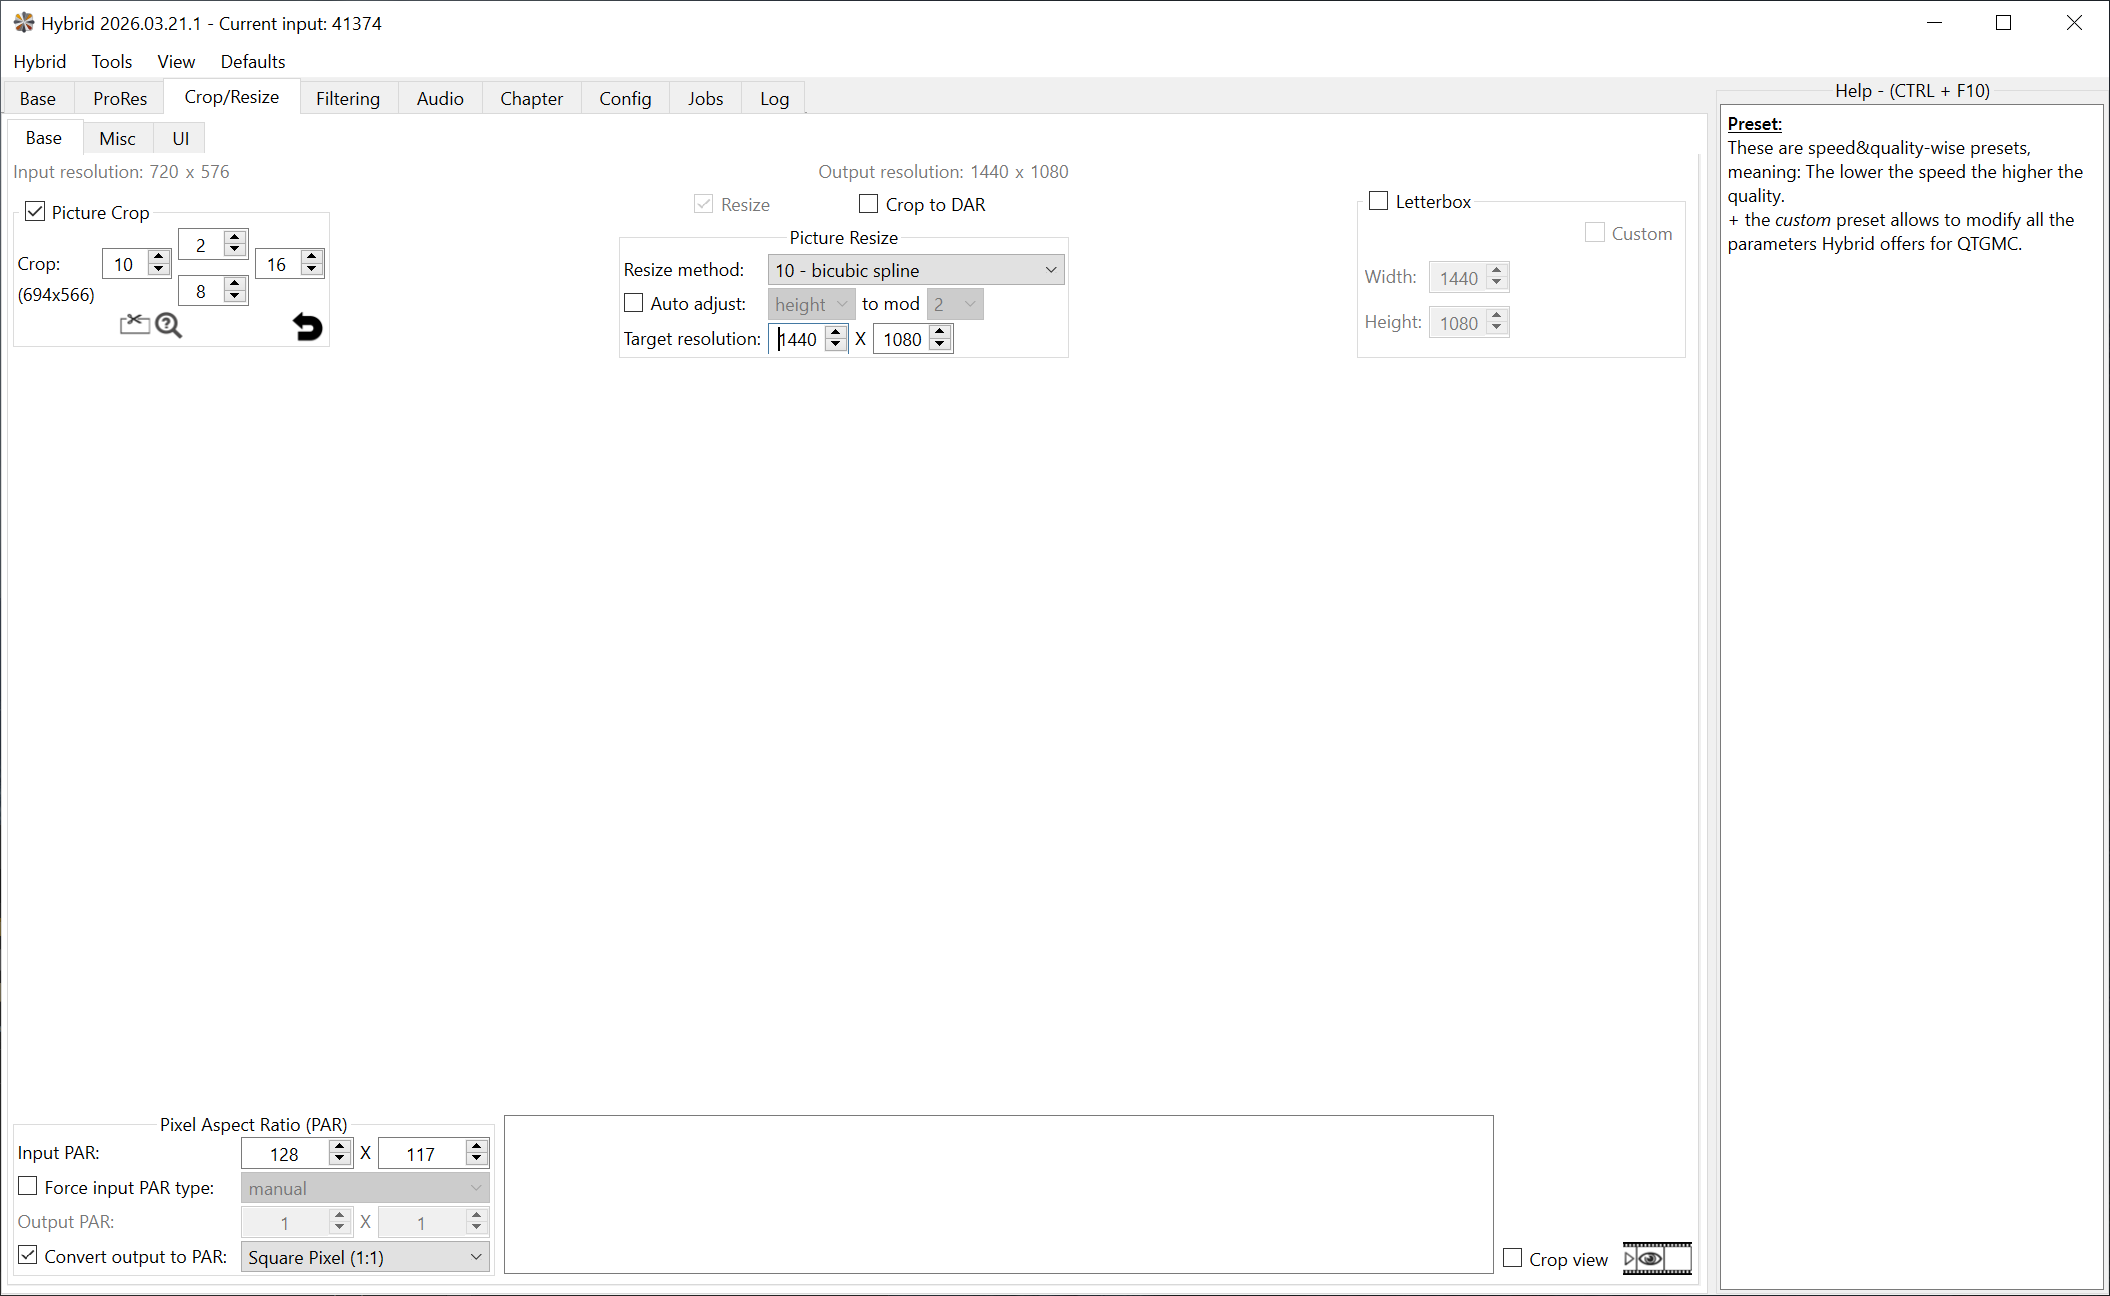
- Adjust the “Target resolution” to our desired width of 1440px
- This will adjust the target height to 1074px
- Untick “Auto adjust” and enter 1080px as the height
- This will stretch the footage slightly taller but I’ve not noticed.
Filtering Tab
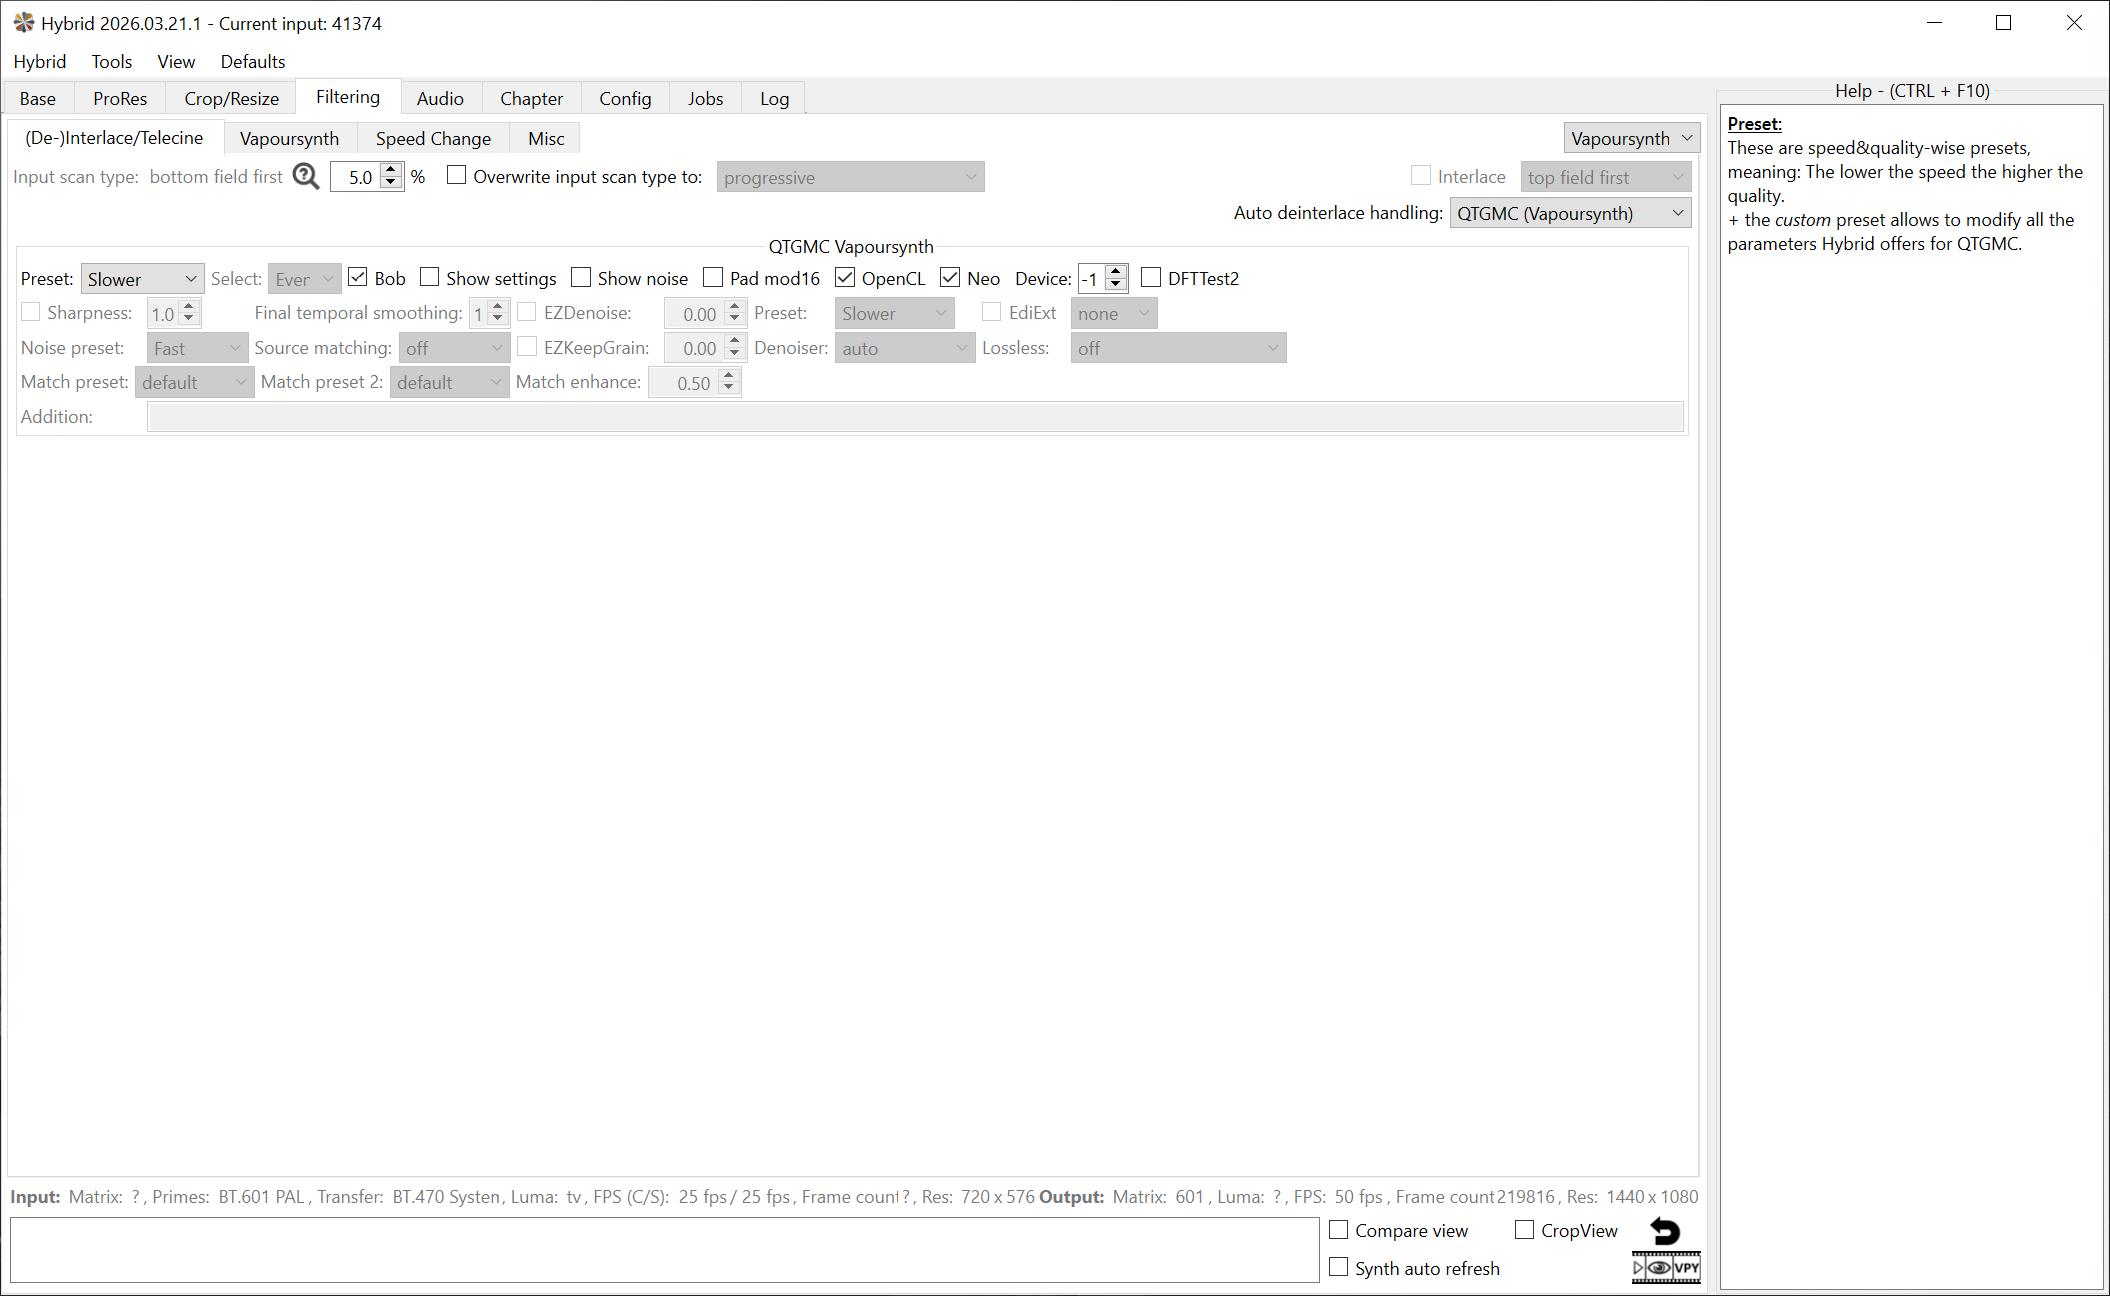
- You may need to specify if the footage is bottom or top field first - mine was correctly detected as bottom field first.
- If this is wrong, you’ll notice the motion looks wrong as it’d move forwards then backwards.
- Make sure the “Auto deinterlace handling” option is set to “QTGMC (Vapoursynth)”
- Change the preset to “Slower”
- QTGMC has built in noise reduction which helps clean up some of the fuzz in footage.
- I found this was a good option for noise reduction and to avoid jitter of the date text in the corner of the video.
- Be careful not to over-do it - if you go too far it can look like plastic.
- This post from Andrew Swan may be useful to get a sense of what each of these presets is doing.
- Tick the “Bob” option
- This doubles the framerate of the output from 25fps to 50fps.
- Tick the “OpenCL” option
- This will use your GPU for some of the processing which may improve processing times.
After much experimenting, I decided not to add any extra filters, but it may be worth experimenting with the filters in the “Vapoursynth” tab.
In particular:
- I saw lots of recommendations to use the NNEDI3 frame resize filters for smarter upscaling but I found this had a negligible impact so I kept this off.
- Some recommend de-noise, de-grain and de-halo effects - I went a bit far with these and didn’t like the results, so I ended up sticking with just QTGMC.
Colourspace transformation
Hybrid does allow you to change the colourspace to convert from Rec. 601 to Rec. 709. However, I found that this ended up making the colours look wrong or stripping out detail. Instead, I decided to do all colour transformations in ffmpeg in the next stage.
Start processing
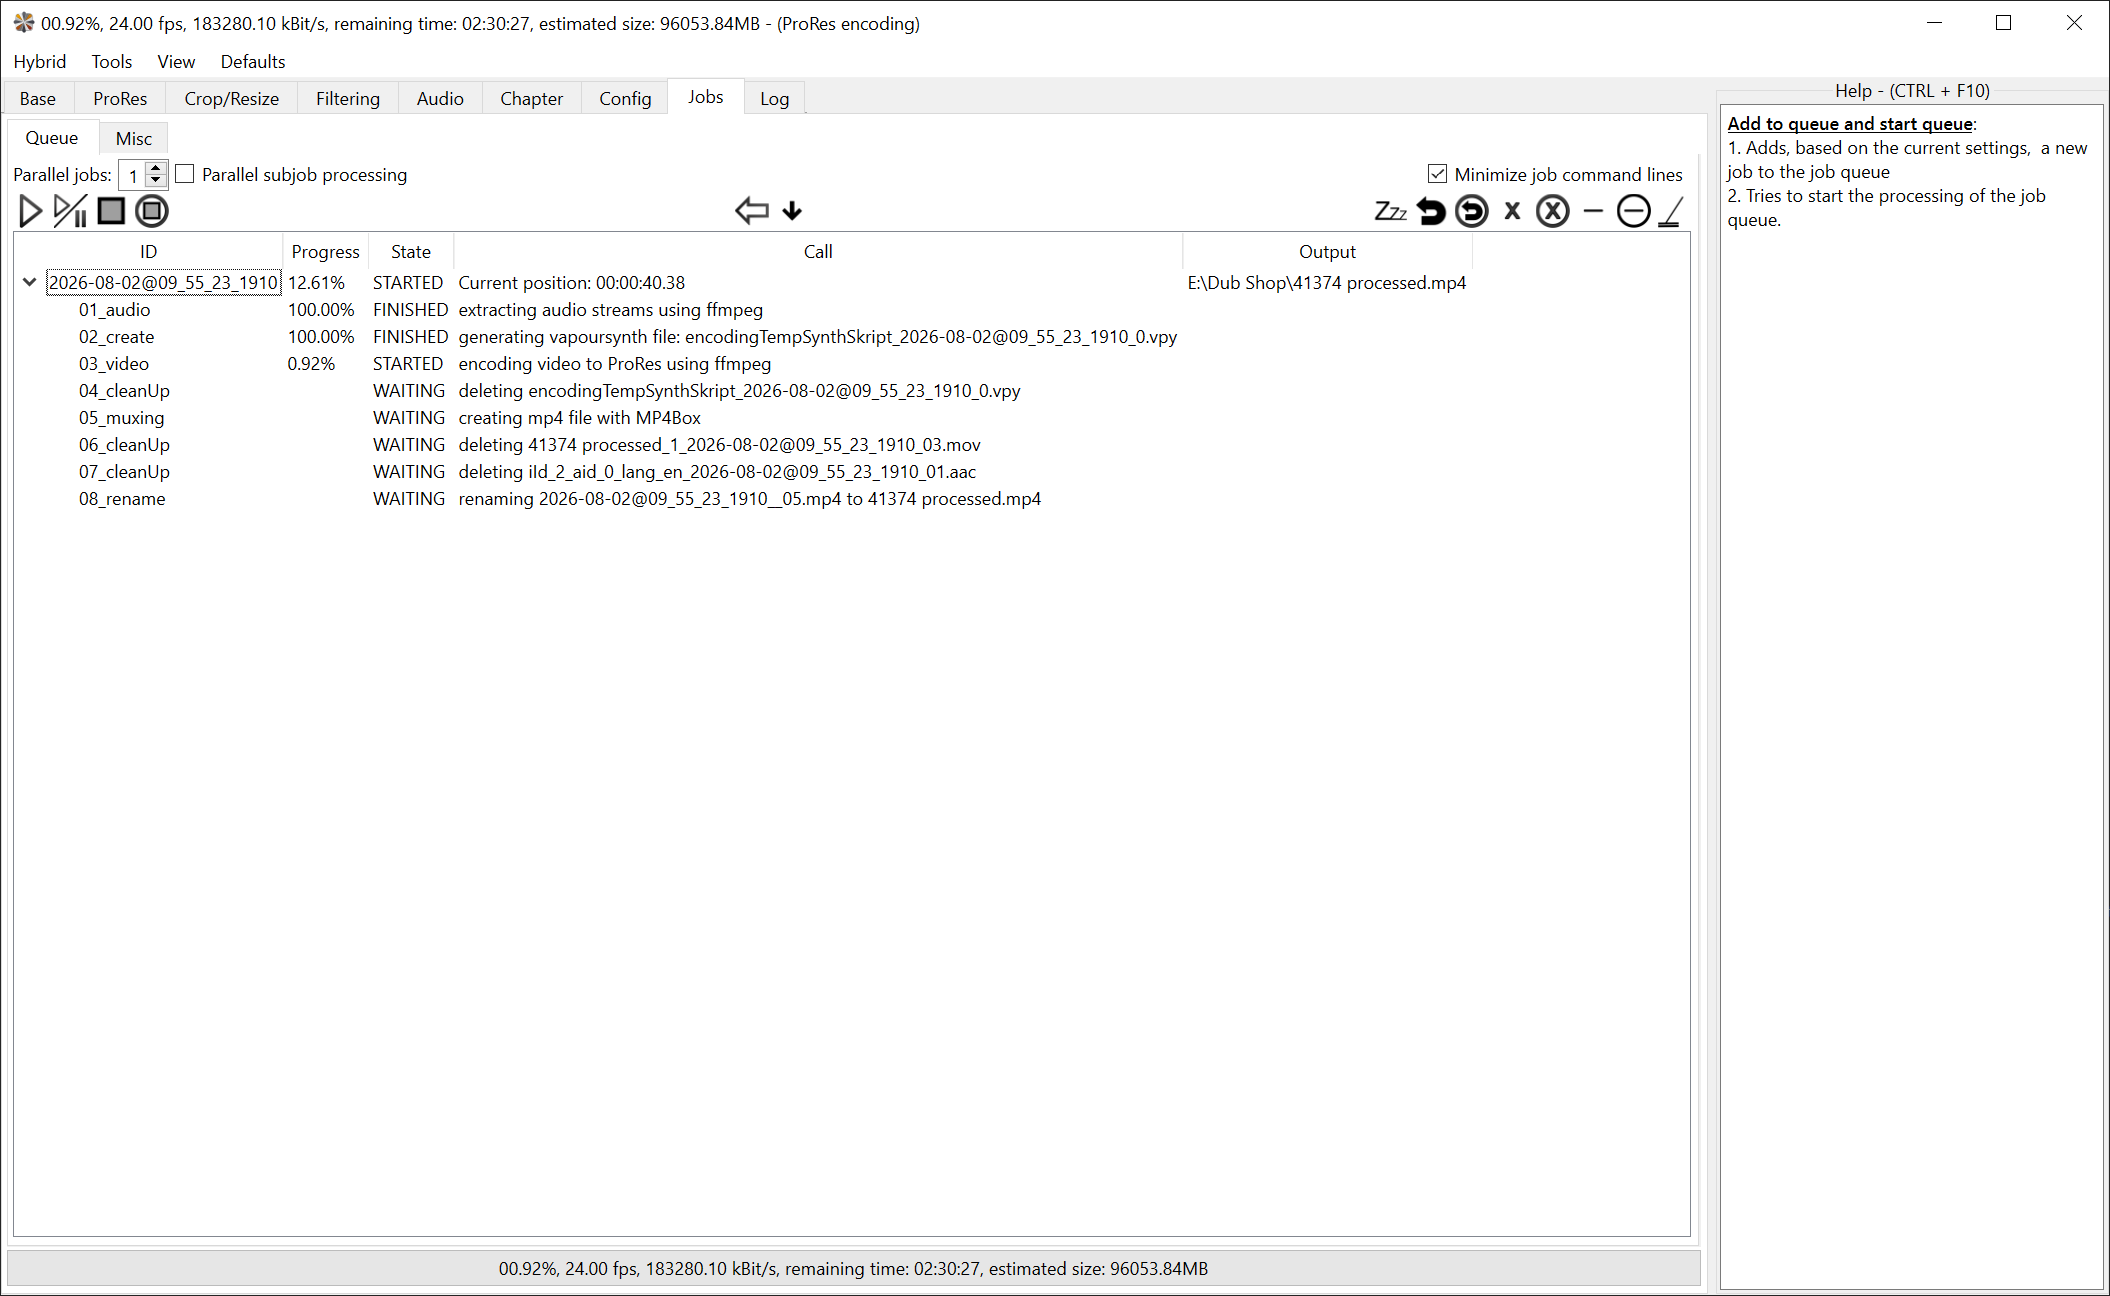
When you’re ready, click “Add to queue and start queue” in the bottom-right corner, then head to the “Jobs” tab to watch it run. It will start by extracting the audio, and then you’ll see it begin processing the video.
ProRes is a very high bitrate format - 90 minutes of footage came in at around 125GB. Consider these more of an intermediary file, you won’t need to keep these files around after stage 3. It’s not quick - I found that this ran at around 24fps on my old Intel i7-4770 so I was facing around 3.5 hours for a 90 minute file.
Stage 3 - Re-encoding and changing colourspace
We’ve now got a clean ProRes file which has been deinterlaced, upscaled, and cropped. However, it’s absolutely massive (around 125GB for 90 minutes of footage), and the colours are still in the Rec. 601 colourspace.
This is the command I used to encode my footage with ffmpeg:
ffmpeg -i input.mp4 \
	-vf "colorspace=all=bt709:iall=bt601-6-625:fast=0" \
	-c:v libx265 -pix_fmt yuv420p10le -preset fast -crf 20 \
	-x265-params "no-sao=1:aq-mode=3:colorprim=bt709:transfer=bt709:colormatrix=bt709" \
	-c:a copy \
	-tag:v hvc1 \
	output.mp4
Here’s what each part does:
-i [path]- this just specifies the input file; this is where you put the path to the ProRes file.-vf "colorspace=all=bt709:iall=bt601-6-625:fast=0"- convert from the Rec. 601 (BT601) colourspace to Rec. 709 (BT709) using high precision.-c:v libx265 -pix_fmt yuv420p10le -preset fast -crf 20- use the H.265 (HEVC) codec with 10-bit colour, the ‘fast’ preset, and a Constant Rate Factor (CRF) of 20 (near visually lossless).-c:a copy- copy the audio as it is.-tag:v hvc1- set the FourCC video codec tag tohvc1instead of the defaultsev1; this means the output footage can be played in QuickTime.
We intentionally don’t use hardware encoding here: hardware encoders are usually much faster, but software encoders are often more flexible and can produce higher-quality results for this kind of archival-style work. This will be another slow process; I managed around 30 fps on a MacBook Pro with an M1 Pro CPU.
Stage 4 - Chaptering
Even after separating clips from the footage, the files I had left are still between 40 and 90 minutes long. To make it easier to find footage from a specific day or event it can be helpful to add chapters into the footage.
I’d like a chapter for each major change in scene or day - that’s quite a lot, so I developed a process to make this more efficient.
Step 1 - Creating markers with DaVinci Resolve
DaVinci Resolve is my go-to video editing tool so I decided to use this to create chapters.
- Create a new project in DaVinci Resolve.
- Drag the clip into the “Media Storage” pane in the “Media” tab.
- Right click on the clip and choose “Scene Cut Detection”.
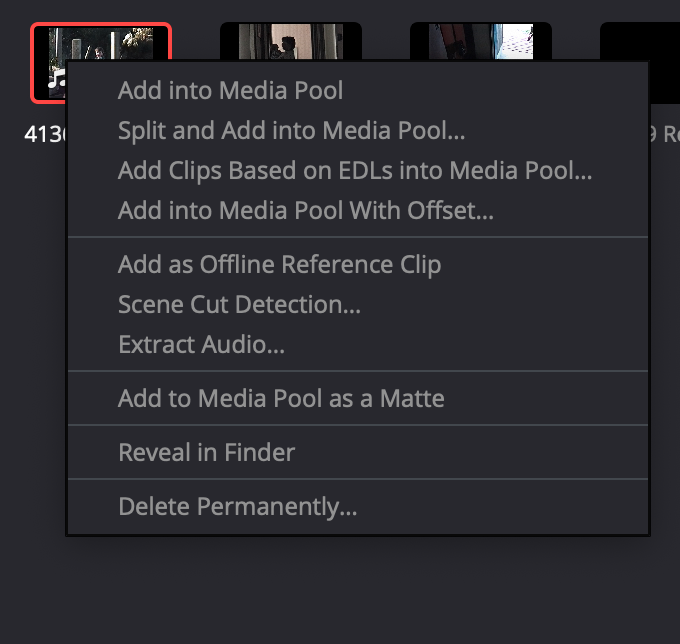
- Click the “Auto Scene Detect” option - Resolve will identify all the scene changes.
- Click “Add Cuts to Media Pool”
- Create a new Timeline and drag all the clips into the timeline.
- It should automatically put the clips in the correct order.
- Scrub through the footage in the timeline - when you’ve found a new scene, press the “M” key twice.
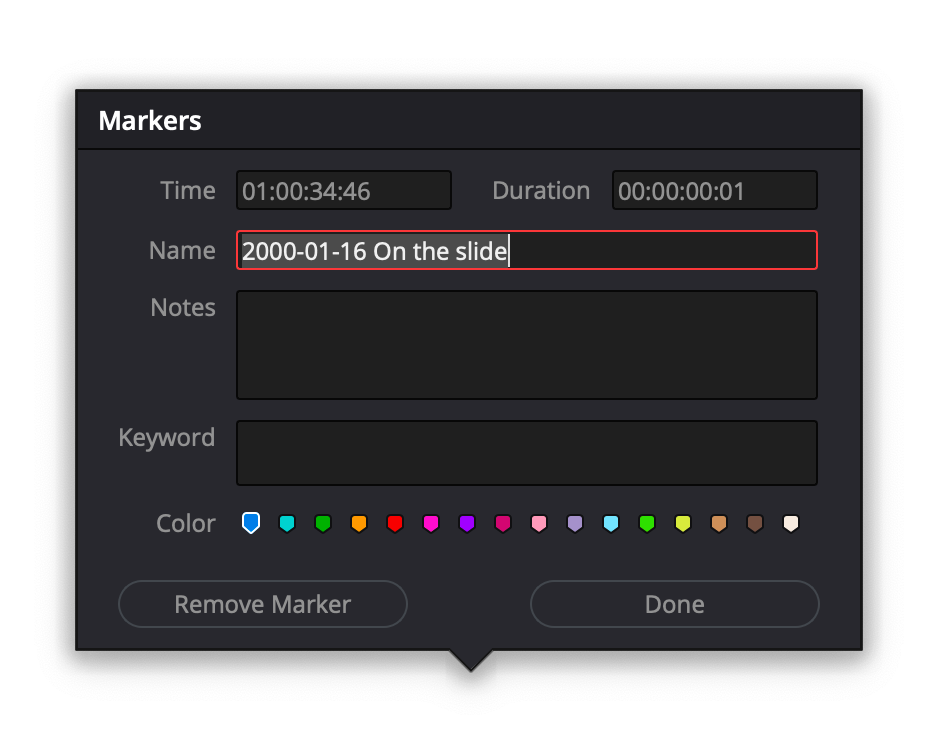
- This will create a marker at that time and prompt you to enter a name, e.g.: “2000-01-16 On the slide” - hit enter when done.
- Create markers for the start of as many chapters as you like - I had 278 chapters for one of my files!
Step 2 - Turn markers into a text file
Now we need to get these markers out of DaVinci Resolve to a more portable format.
- Right click on the timeline in the Media Pool.
- Select “Timelines” -> “Export” -> “Timeline Markers to EDL…” and save this file somewhere on your computer.
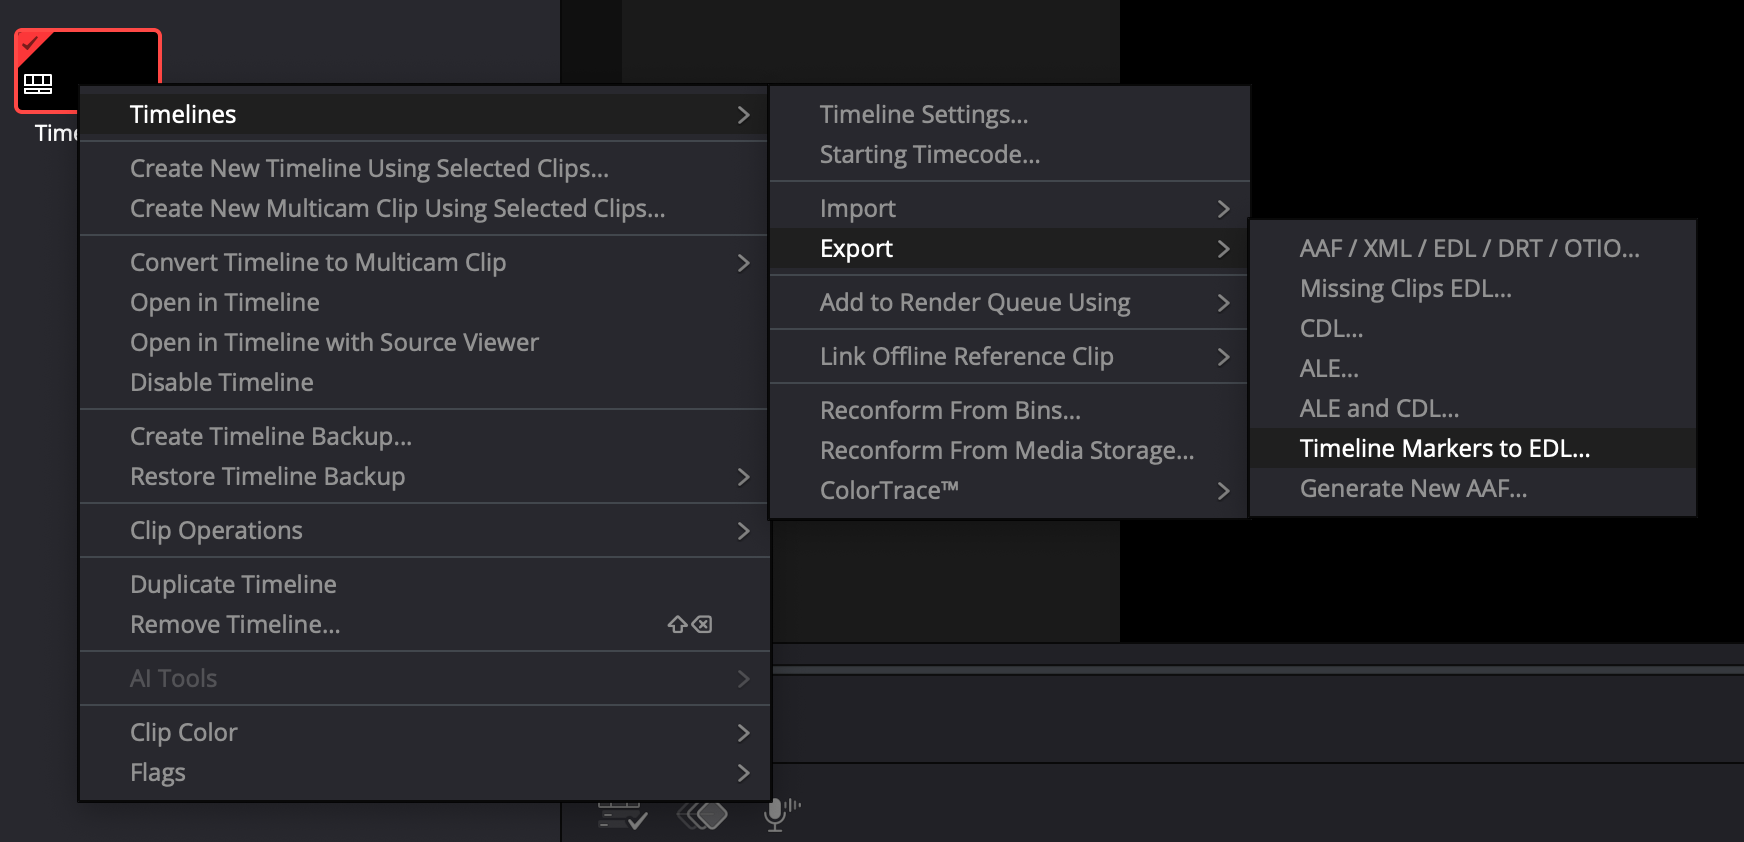
- Use editingtools.io to convert this EDL file to a CSV file.
- Select the “From” option “DaVinci Resolve > Timeline Markers EDL (.edl)”
- Select the “To” option “CSV [comma-separated values] (.csv)”
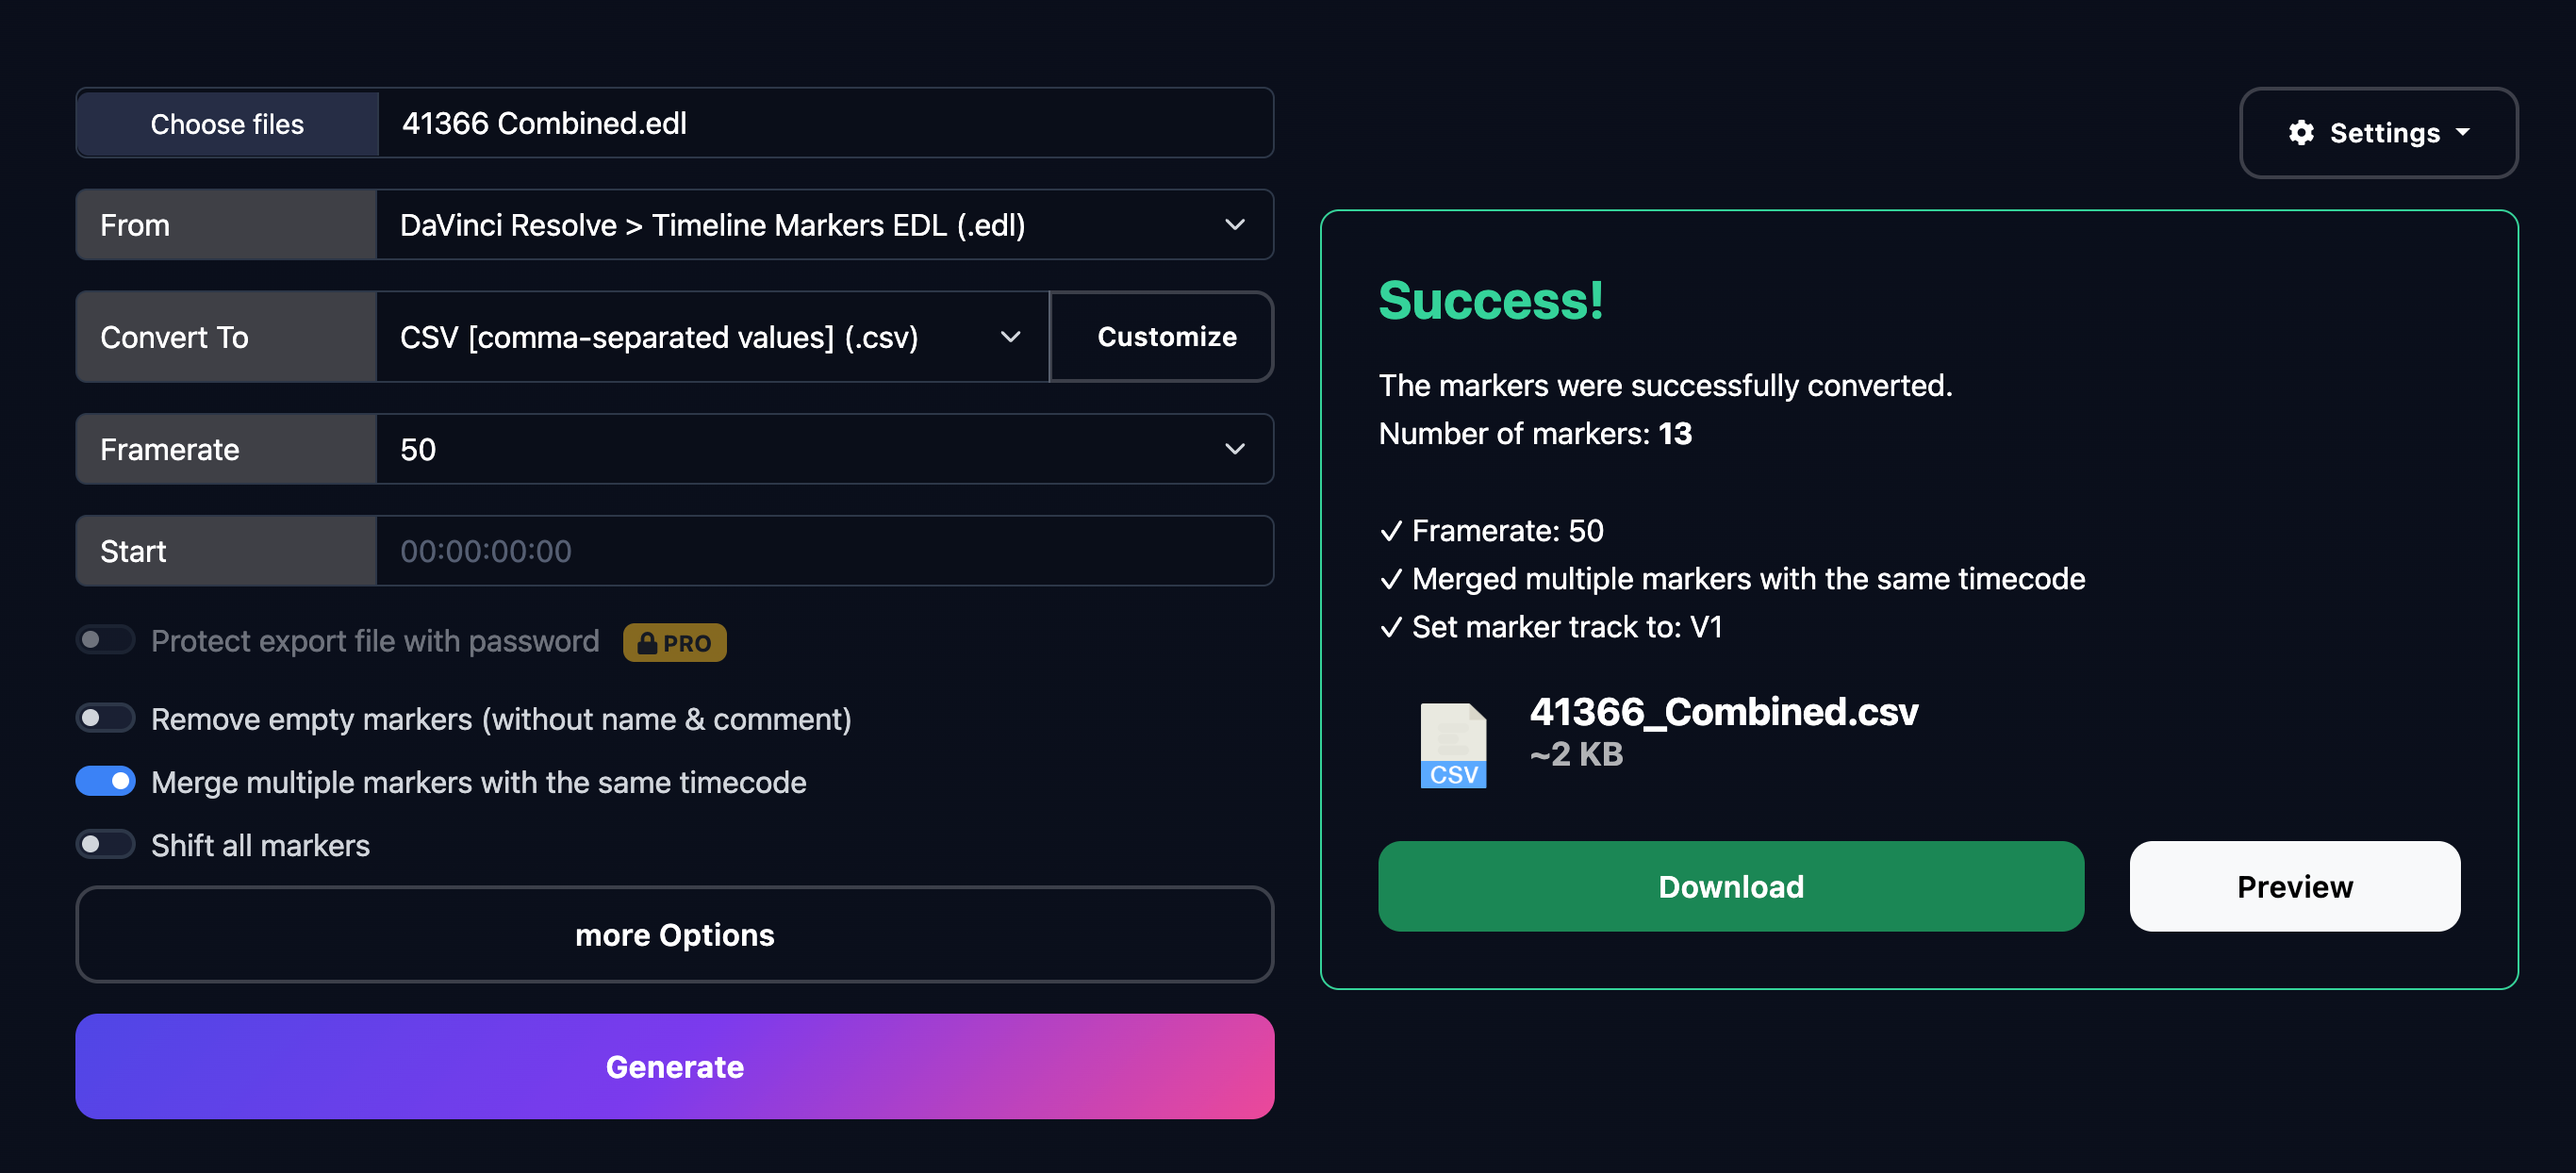
- Hit “Generate” and download the CSV file.
Now we have a CSV with a time code for each of your chapters. We need to convert it to a simple text file, and convert the time code from HH:MM:SS:FF (referencing an exact second and frame) to HH:MM:SS.ms (referencing a specific time).
I made a little Python script to convert the CSV to a text file - see the Gist.
Step 3 - Add chapters to video
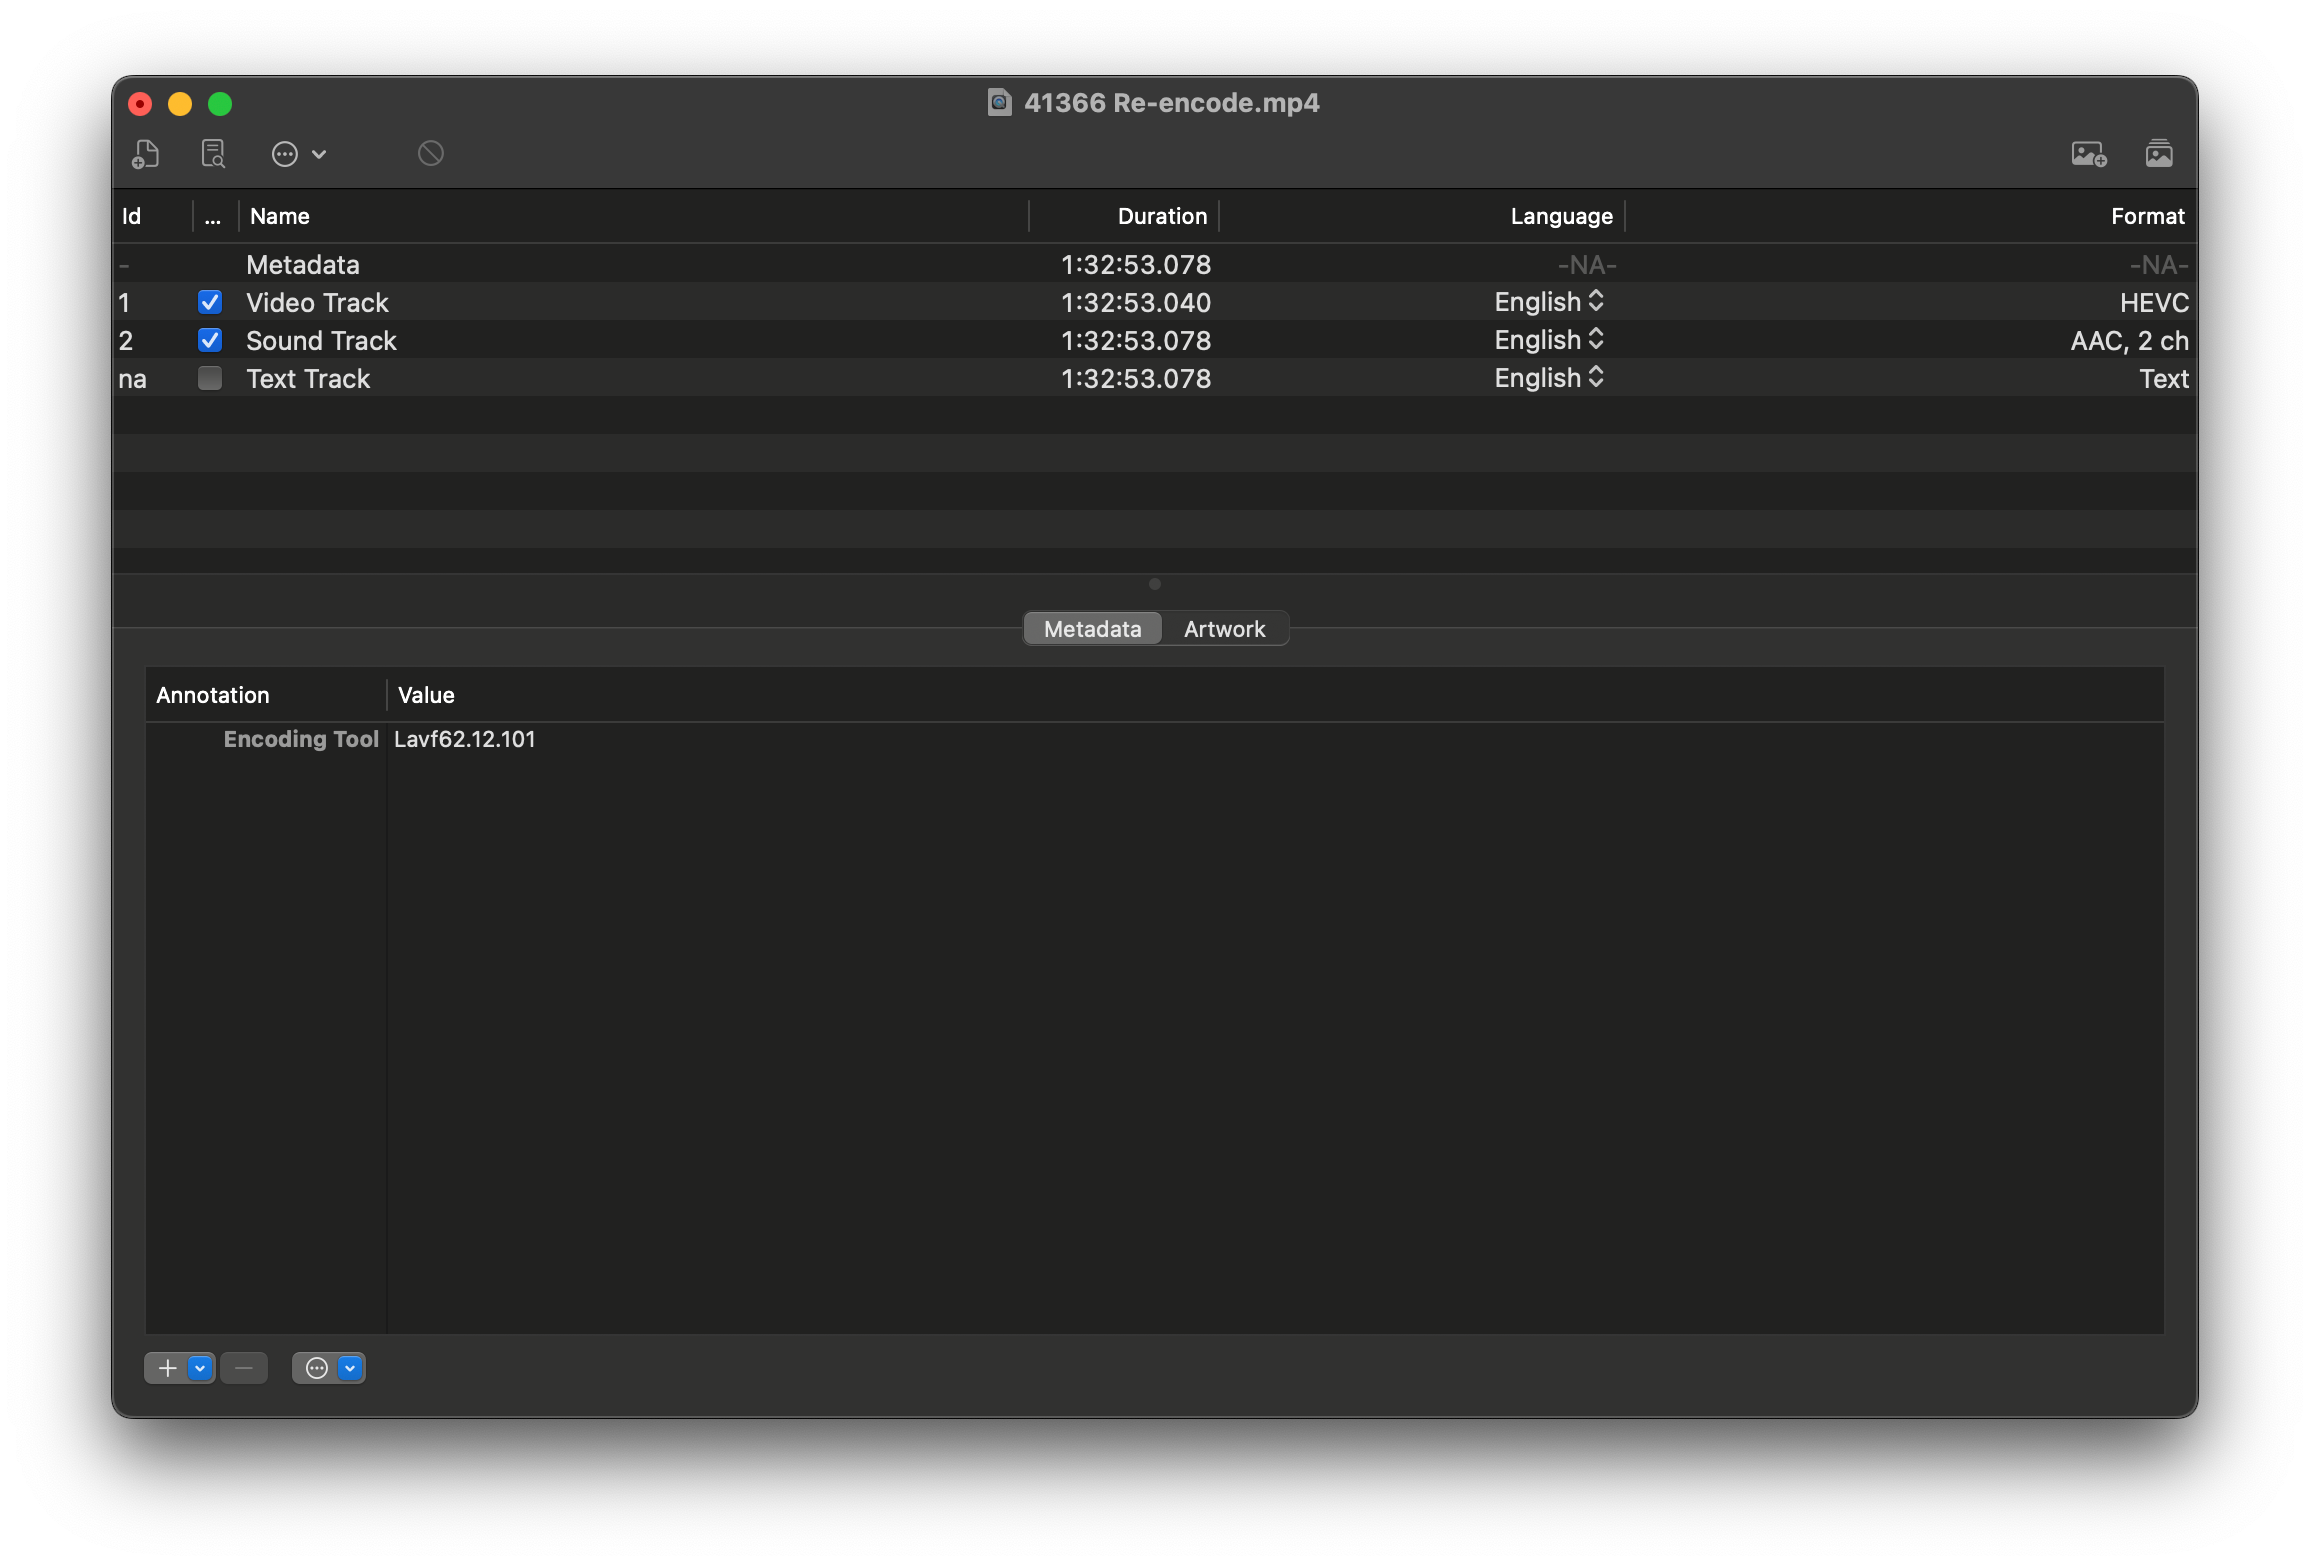
I used a Mac app called Subler to write the chapters into the video file - this is just a special track on the video so doesn’t require re-encoding the footage.
- Download Subler
- Open the video file.
- Choose “File” -> “Import” -> “File…” and select your generated text file.
- Choose “File” -> “Save” to write the chapters.
Stage 5 - Sharing
I moved these newly optimised files into my family media folders on Google Drive. These are the versions optimised for viewing, while I still retain an archive of the high-quality source files from the digitisation process.
In addition to Google Drive, I created a “Home Videos” section in Plex and added the footage there. Plex is a great way to share family videos because it’s easy to play on TVs compared to Google Drive which might require casting from a phone or computer.
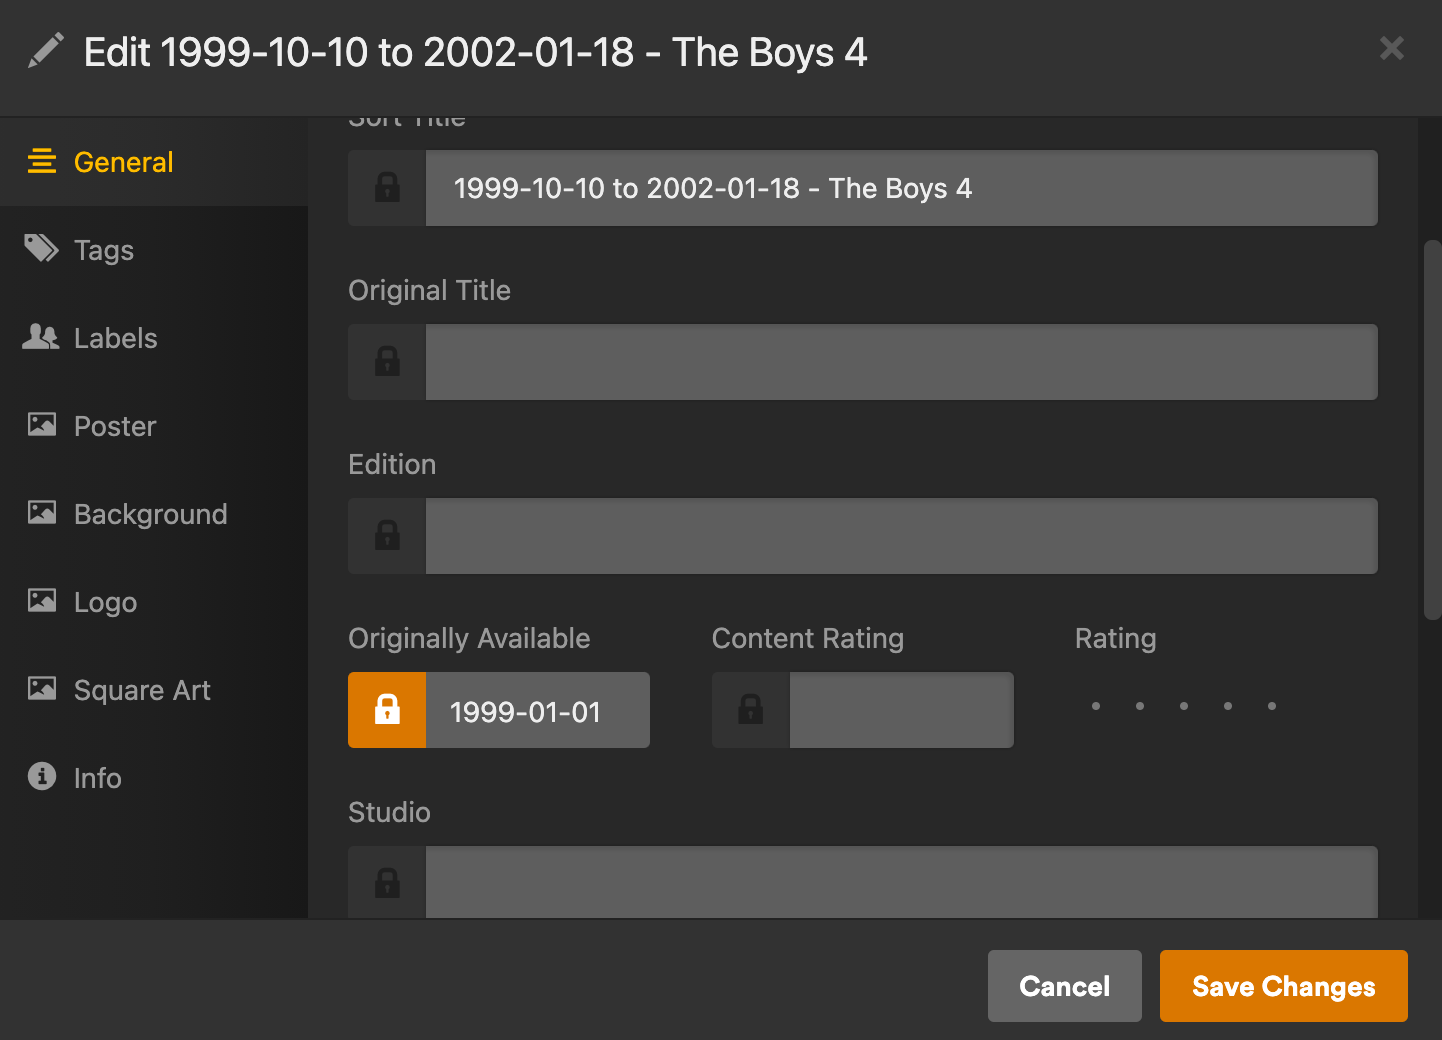
Once the media was imported into Plex I made sure to set the ‘Originally Available’ time on the footage as this helps Plex order the file correctly. Plex supports chapters too, making it easy to jump around the footage.
Conclusion
Modernising this footage has been an incredibly lengthy process - both for me learning the process and discovering the right settings; and for my computers spending nights processing footage!
However, I’m very pleased with how it’s all turned out. In particular, I’m happy with the watchability that comes from splitting and chaptering the footage - this makes it much easier to find particular scenes without having to scrub through the entire file.
The end result is space-efficient and clean, while still retaining the lovely charm and grain of Video8 footage.